THE SkilMatch
CALENDAR SYSTEM (SCS)
INTRODUCTION, SETUP, RECOMMENDATIONS AND
STANDARDS
PROMPTED SCHEDULING FOR ACTIONS: JOB, EMPLOYEE,
CONTACT
PROMPTED SCHEDULING FOR CUSTOMER CALL DATES
(review
PROMPTED SCHEDULING FOR ACTIONS first)
GROUP JOB PROMPTED SCHEDULING
(review
PROMPTED SCHEDULING FOR ACTIONS and COMMENT SCHEDULING first)
COMMENT SCHEDULING
(review PROMPTED SCHEDULING FOR ACTIONS
first)
CALENDAR VIEWING
CALENDAR FILTERING: VIEWING AND PRINTING
CALENDAR “GO TO FILE TO PERFORM EVENT OR TASK”
MANUAL SCHEDULING: PERSONAL EVENTS OR TASKS
(review
PROMPTED SCHEDULING FOR ACTIONS first)
MANUAL SCHEDULING: BUSINESS EVENTS OR TASKS
ASSOCIATED WITH A SKILMATCH FILE
(review
PROMPTED SCHEDULING FOR ACTIONS first)
MANUALLY CLOSING AN EVENT OR TASK
GENERAL FIELD DESCRIPTIONS AND INFORMATION FOR
EVENT OR TASK DATA ENTRY SCREEN
GENERAL FIELD DESCRIPTIONS AND INFORMATION
FOR FILTERING SCREEN
INTRODUCTION,
SETUP, RECOMMENDATIONS AND STANDARDS
Basic functions of the SkilMatch Calendar System (SCS) include:
·
The SCS automatically creates a unique calendar for each
user when you schedule your first event or task.
·
The SCS can be used for your personal or your business
events and tasks.
· The SCS will automatically “prompt” you to schedule an event or task whenever you change an “action” or “call” date in SkilMatch.
· The SCS will let you manually add an event or task.
· The SCS will let you change an event or task after it has been scheduled.
·
The SCS will remind you of these events and tasks through
system messages.
·
The SCS will allow you to “perform” an event or task
directly from the calendar display.
·
The SCS will allow you to display or print your events and
tasks calendar.
Before you can begin using the SCS, the person in charge of setups and valid choices for your system (who must have SKMANAGE as a “group profile”) must:
·
Design and enter SCS “TYPE” choices and SCS “STATUS”
choices.
·
Setup basic SCS options.
(Must be performed by your System Administrator... or by SkilMatch support staff for
SkilMatch-E users.)
·
Setup “user specific” time zone parameters if all of your
organization’s users are NOT in the same time zone (including during
Daylight Savings Time). By doing this
setup, all SCS times and reminders will be based on user location, not the
server’s location. (Must be
performed by your System Administrator...
or by SkilMatch support staff for SkilMatch-E users.)
Recommendations:
·
Open your FIRST SkilMatch session as your “primary
session”. Go to a seldom used menu so
that you will be aware that this is the “first” session”. Since this is the first session you are
signing on to, you will receive ALL “break” or pop up messages on this
session. Use this session just to
receive and view messages.
·
Open your SECOND SkilMatch session as your SCS “calendar
session”. Display your SCS calendar and
use this session only for SCS calendar viewing, to “perform tasks” from the SCS
calendar and to schedule manual “personal” events or tasks. You will occasionally need to “refresh” the
SCS calendar screen you are viewing to be able to see new events or tasks that
have been added (from other sessions) since you last “displayed” the
screen. You may “refresh” the SCS
calendar screen at any time by clicking [Save changes]
or [Ignore changes], which
will force the screen to re-display.
·
Open an additional session or sessions as “working
session(s)”. Use these sessions for all
of your other SkilMatch functions (including adding new “prompted” events or
tasks to your SCS calendar or sending messages to other users).
·
Schedule all “system” events and tasks through automated
SCS “prompting”, even though any event or task can be entered manually on your
“calendar session”.
Standards:
·
Any event or task may
be manually “completed” or closed by changing its status to “#D”.
·
Changing the status to “#D” also disables any unsent
requested reminder messages.
·
Changing the status to “#D” removes the item from the
“open” calendar and moves it to the “completed” calendar.
·
Any “completed” event or task may be “reactivated” by
changing its status to something other than “#D”.
PROMPTED
SCHEDULING FOR ACTIONS: JOB, EMPLOYEE, CONTACT
(This section of documentation
uses the automated prompting for scheduling of an event or task for a job order
when an action date changes; however, this same logic applies to all “actions”
with a “type” throughout the SkilMatch system.)
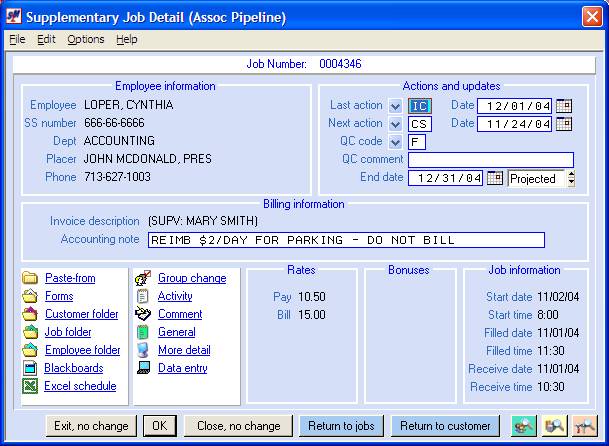
This screen has two action dates
that can be changed through your normal procedures. If you change either or both action dates, when you click [OK] or exit this screen in any way which
will update your action date change(s), BEFORE you are taken to the screen
where you would normally be taken, the SCS will prompt you to schedule an event
or a task (or multiple events or tasks) and then will take you to the screen
where you would normally be taken.
1. Change one or both action
dates on the screen and click [OK]. (For this example only the Last Action date
has been changed to 12/01/04)
2. You will be prompted by the SCS to schedule an event or task.

Take note of the following:
(1) The SCS screen shows
that this is an Event/Task entry for “Last Action” (to distinguish this entry
from an entry for “Next Action” if that date was also changed).
(2) The SCS has inserted
the description of the action type (IC) “INTERVIEW CONFIRMED” for the “Task”
(but can be changed if desired).
(3) The SCS has inserted
the Last Action date 12/01/04 for the “Date” (but can be changed if desired).
(4) The cursor has been
positioned at “Time” and the SCS has inserted a default time of 8:00 am
(but can be changed if desired).
If or when you change the time, be sure you also change the AM or PM, when appropriate, to coordinate with the new time. (If you change the time from 8:00 to 2:00, and do not change AM to PM, your time will be 2:00am! This will, of course, affect the position of the event or task on your calendar and will also affect reminder message sending.)
(5) The SCS has inserted a
“Type” of *N (but can be changed if desired).
If *N (None/General) is a valid choice for your organization, you do not need to change it, but you may if other choices are available. If you prompt for another choice with *N showing, you will be shown all valid choices. If you prompt for another choice with any other letter+blank showing (like “GG”), you will be shown all valid choices that start with that letter. If *N is not a valid choice, you will be required to select a valid choice before you leave this screen.
(6) The SCS has inserted a
“Status” of *N (but can be changed if desired).
If *N (None/General) is a valid choice for your organization, you do not need to change it, but you may if other choices are available. If you prompt for another choice with *N showing, you will be shown all valid choices. If you prompt for another choice with any other letter+blank showing (like “GG”), you will be shown all valid choices that start with that letter. If *N is not a valid choice, you will be required to select a valid choice before you leave this screen.
(7) The SCS has inserted a
“Job” of 0004346 (the job where you changed the date).
(8) The SCS knows that the
employee is “LOPER, CYNDI” and the customer is “ASSOC PIPELINE CONTRACTORS,
INC”.
(9) Entry or change of any
data in the blue fields is not allowed (since the SCS knows all the information
that is needed).
(10) The SCS assumes you do
not want a reminder break message sent at 6 am on the morning of the event or
task (but can be changed if desired).
Checking this option will cause
a message to be in your messages when you sign on in the morning.
(11) The SCS assumes you do
not want a reminder message sent 15 minutes before the scheduled event or task
time (but can be changed if desired)
Checking this option will cause
a message to “pop up” on your screen approximately 15 minutes before time of
the event or task. If you are not
signed on at the time the message is sent, the message will be in your messages
the next time you sign on.
(12) The SCS allows you to
enter “Details” of the event or task, if desired.
3. When the data on the screen
is as you want it to be, click [OK] to
add this event or task to the SCS.
If the SCS detects anything that
is invalid on the screen, a message will be displayed near the bottom of the
screen and you will have the opportunity to correct the problem. After the problem has been corrected, click [OK] to add the event or task.
If you do not want to schedule an event or task for this changed Action Date, click [Cancel update] to cancel the event or task entry FOR THIS ITEM.
Whether you have “entered” or “cancelled” this Last Action event or task, if you have ALSO changed the Next Action date, you will then be prompted by the SCS to schedule an event or task for Next Action using the same logic as described above.
The same scenario is valid
for scheduling SCS events or tasks for Employee Actions and for Customer
Contact Actions.
PROMPTED SCHEDULING FOR CUSTOMER CALL
DATES
(review PROMPTED
SCHEDULING FOR ACTIONS first)
A similar scenario is also
valid for scheduling SCS events or tasks for Customer Next and Last Call Dates
on the Customer Sales Profile Screen and the Customer Add Comment Screen, with
these differences: Since a “type” does not exist for these Call Dates,
when the prompting for the event or task occurs, the “Task” description must be
manually keyed. If four dates are
changed, four SCS prompts will occur.
GROUP JOB PROMPTED SCHEDULING:
(review PROMPTED
SCHEDULING FOR ACTIONS and COMMENT SCHEDULING first)
A similar
scenario is also valid for group job SCS scheduling from either the job order
display or from job order data entry.
These are the differences:
From the job order display
1. From the job order display, click [Group Change].

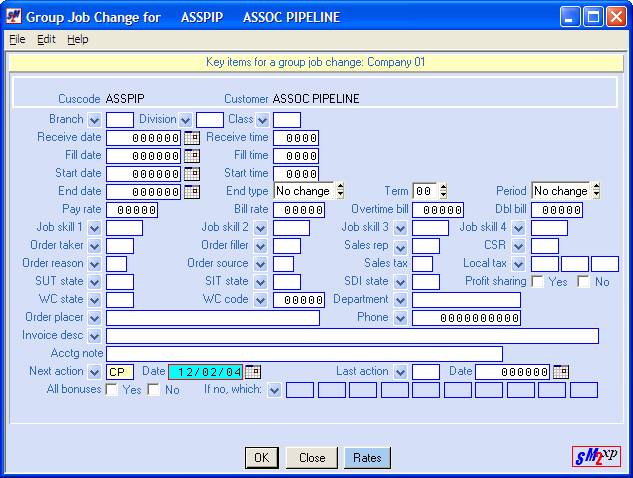
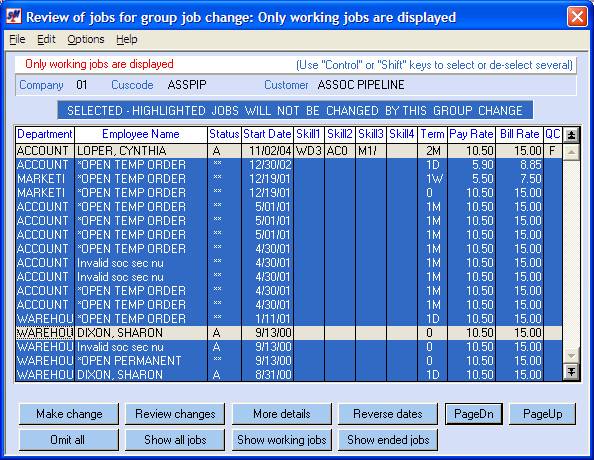
2. The Group Job Change Screen will appear. Key or select one or both Action Dates and types (and key or select any other items) for the group change and click [OK].
3. The Review of Jobs for Group Job Change Screen will appear. Choose the jobs for the group change and click [Make change].

4. You will be prompted by the SCS to schedule an
event or task for each Action Date keyed.
Although the employee is shown as
“DIXON, SHERRY” for reference (the person from the lowest job number of the
jobs selected), the event or task will be scheduled as a “Group Job” event or
task in the SCS to remind you that when it is time to “perform” the event or
task, the event or task must be performed for a group of jobs. When you “perform” the task, you will be
taken to the “SHERRY DIXON” job order for this customer to take action on the
group task, even though, ultimately, “SHERRY DIXON” may not be one of the
employees selected when you actually perform the group task. Complete this screen and click [OK] or click [Cancel update]
to not schedule the event or task associated with this Action Date.

From job order data entry
1. From the job order data entry screen, click [Group Change].
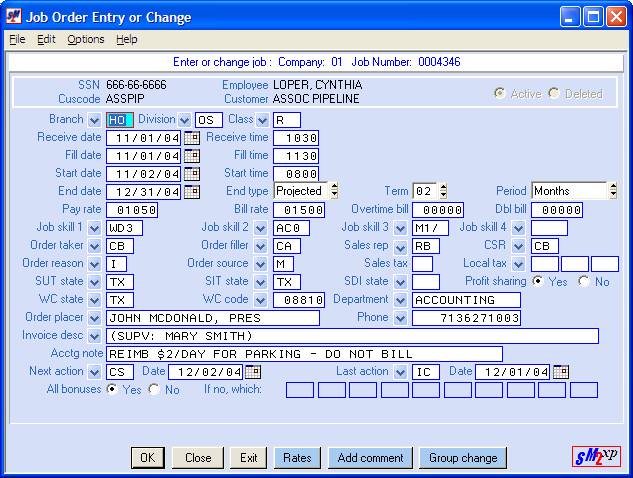
2. The Group Job Change Screen will appear. Key or select one or both Action Dates and types (and key or select any other items) for the group change and click [OK].
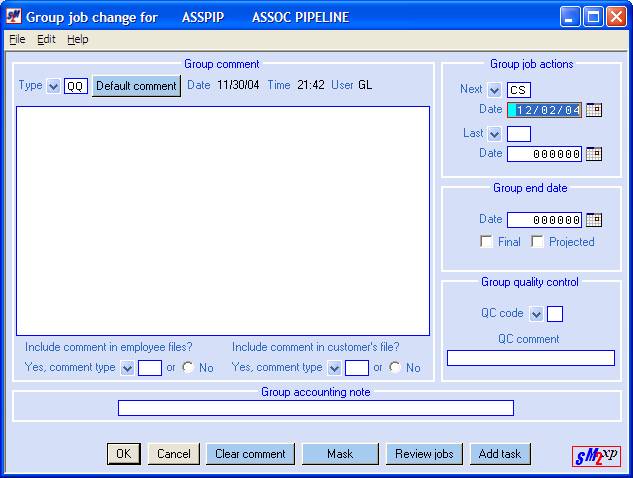
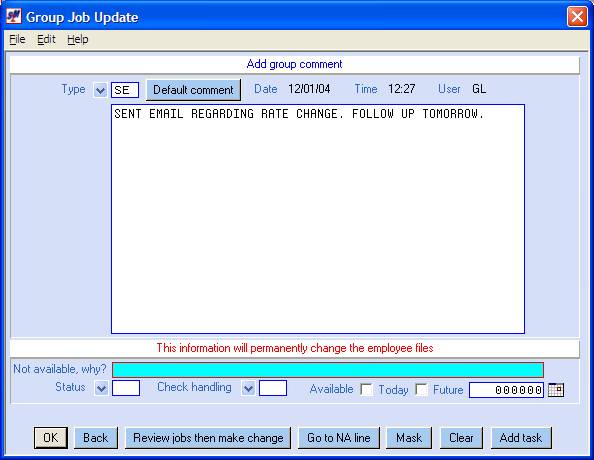
3. The Add Group Comment Screen will appear. Add a
comment or not. Key other changes
desired on this screen. If a comment is
added, decide if this comment should also prompt for an event or task. If it should, click [Add task]. If it should not, click [OK] or [Review jobs then make change].
3. The Review of Jobs for Group Job Change Screen will appear. Choose the jobs for the group change and click [Make change].
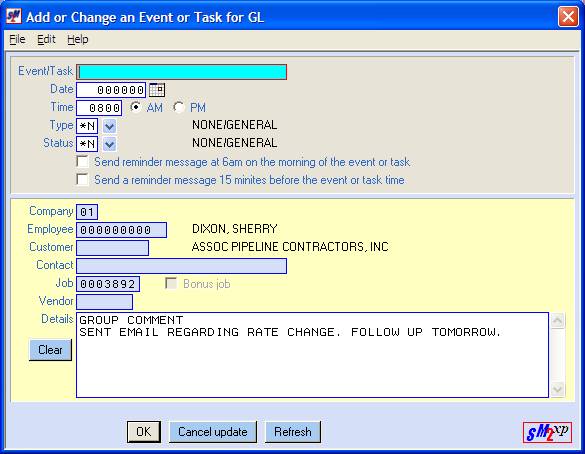
4. You will first be prompted by the SCS to schedule an event or task associated with the added comment IF you had clicked [Add task] on the Add Group Comment Screen. Although the employee is shown as “DIXON, SHERRY” for reference (the person from the lowest job number of the jobs selected), the event or task will be scheduled as a “Group Job” event or task in the SCS to remind you that when it is time to “perform” the event or task, the event or task must be performed for a group of jobs. When you “perform” the task, you will be taken to the “SHERRY DIXON” job order for this customer to take action on the group task, even though, ultimately, “SHERRY DIXON” may not be one of the employees selected when you actually perform the group task. Complete this screen and click [OK] or click [Cancel update] to not schedule the event or task associated with the group comment.
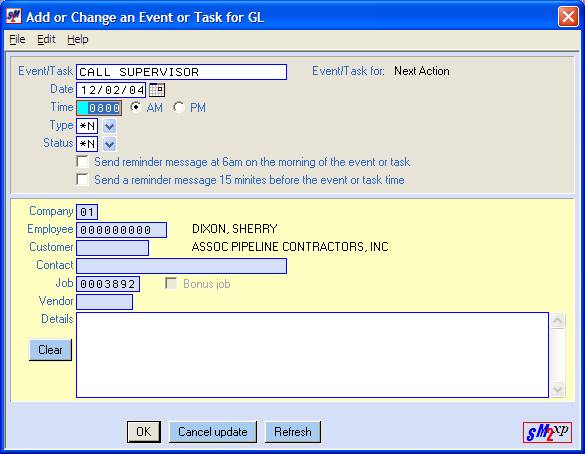
5. You will then be prompted by the SCS to schedule
an event or task for each Action Date keyed.
Although the employee is shown as
“DIXON, SHERRY” for reference (the person from the lowest job number of the
employees selected), the event or task will be scheduled as a “Group Job” event
or task in the SCS to remind you that when it is time to “perform” the event or
task, the event or task must be performed for a group of jobs. When you “perform” the task, you will be
taken to the “SHERRY DIXON” job order for this customer to take action on the
group task, even though, ultimately, “SHERRY DIXON” may not be one of the
employees selected when you actually perform the group task. Complete this screen and click [OK] or click [Cancel update]
to not schedule the event or task associated with this Action Date.
COMMENT SCHEDULING
(review PROMPTED
SCHEDULING FOR ACTIONS first)
You may also add an event or task associated with a SkilMatch file in conjunction with adding a comment to the file.
(This section of documentation
uses the automated prompting for scheduling of an event or task for an employee
when adding a comment to an employee; however, this same logic applies to all
files when adding a comment throughout the SkilMatch system.)
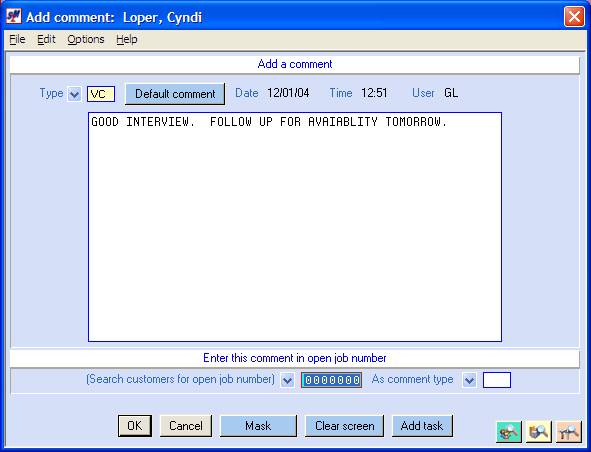
Take note of the following:
The Add Comment Screen has an [Add task] button that will allow this
comment to be associated with an event or task for this person. To schedule an event or task associated with
this comment and this person, click [Add task]
instead of clicking [OK] when you
have finished your data entry on this screen.
1. Click [Add task] when data entry is finished on the add comment screen. You will be prompted by the SCS to schedule an event or task associated with this comment and this person.
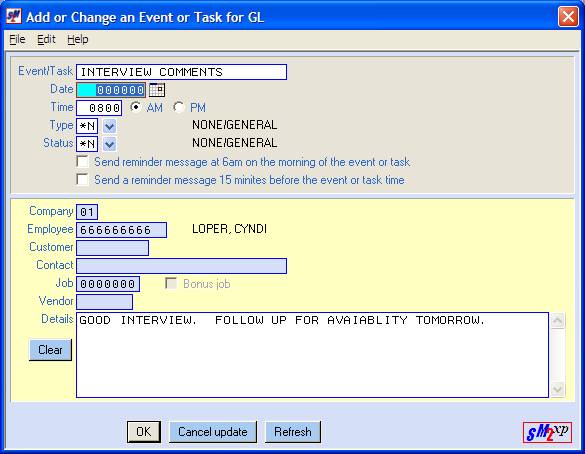
Take note of the following:
(1) The SCS has inserted
the description of the comment type (VC) “INTERVIEW COMMENTS” for the “Task”
(but can be changed if desired).
(2) The cursor has been
positioned at “Date” and the SCS wants you to key or select a date for this
event or task.
(3) The SCS has inserted a
default “Time” of 8:00 am (but can be changed if desired).
If or when you change the time, be sure you also change the AM or PM, when appropriate, to coordinate with the new time. (If you change the time from 8:00 to 2:00, and do not change AM to PM, your time will be 2:00am! This will, of course, affect the position of the event or task on your calendar and will also affect reminder message sending.)
(4) The SCS has inserted a
“Type” of *N (but can be changed if desired).
If *N (None/General) is a valid choice for your organization, you do not need to change it, but you may if other choices are available. If you prompt for another choice with *N showing, you will be shown all valid choices. If you prompt for another choice with any other letter+blank showing (like “GG”), you will be shown all valid choices that start with that letter. If *N is not a valid choice, you will be required to select a valid choice before you leave this screen.
(5) The SCS has inserted a
“Status” of *N (but can be changed if desired).
If *N (None/General) is a valid choice for your organization, you do not need to change it, but you may if other choices are available. If you prompt for another choice with *N showing, you will be shown all valid choices. If you prompt for another choice with any other letter+blank showing (like “GG”), you will be shown all valid choices that start with that letter. If *N is not a valid choice, you will be required to select a valid choice before you leave this screen.
(6) The SCS has inserted
the “Employee” “LOPER, CYNDI” (the person for whom you were adding the
comment).
(7) Entry or change of any
data in the blue fields is not allowed (since the SCS knows all the information
that is needed).
(8) The SCS assumes you do
not want a reminder break message sent at 6 am on the morning of the event or
task (but can be changed if desired).
Checking this option will cause
a message to be in your messages when you sign on in the morning.
(9) The SCS assumes you do
not want a reminder message sent 15 minutes before the scheduled event or task
time (but can be changed if desired)
Checking this option will cause
a message to “pop up” on your screen approximately 15 minutes before time of
the event or task. If you are not
signed on at the time the message is sent, the message will be in your messages
the next time you sign on.
(10) The SCS has inserted
the actual comment in “Details” (but can be changed if desired).
When the data on the screen is
as you want it to be, click [OK] to add
this event or task to the SCS.
If the SCS detects anything that
is invalid on the screen, a message will be displayed near the bottom of the
screen and you will have the opportunity to correct the problem. After the problem has been corrected, click [OK] to add the event or task.
If you do not want to add this
comment-associated event or task, click [Cancel
update].
Variations on comment scheduling of events and tasks
Comment Add Screens that ALSO have Action or Call dates:
When [Add task] is clicked on one of these screens
AND any Action or Call Date has been changed, you will first
be prompted to schedule an event or task associated with the comment and the
person (or job or customer or contact or vendor) as described
immediately above. Then
you will be prompted to schedule an event or task for each Action
or Call Date that has been changed AND, when you are prompted for
those Action or Call Date events or tasks, the actual comment will also be
inserted in the “Details” area of the screen (but can be changed if desired).
CALENDAR VIEWING
To access your SCS calendar:
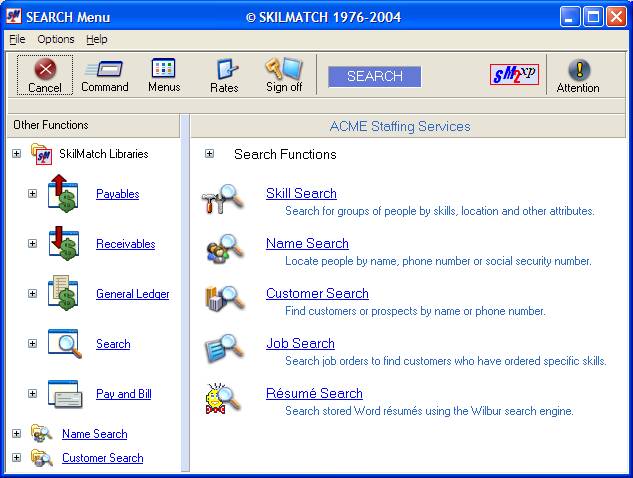
1. Click the ![]() button in the top right corner of any menu
screen or select File> Attention program
from the menu bar on most SkilMatch screens.
button in the top right corner of any menu
screen or select File> Attention program
from the menu bar on most SkilMatch screens.

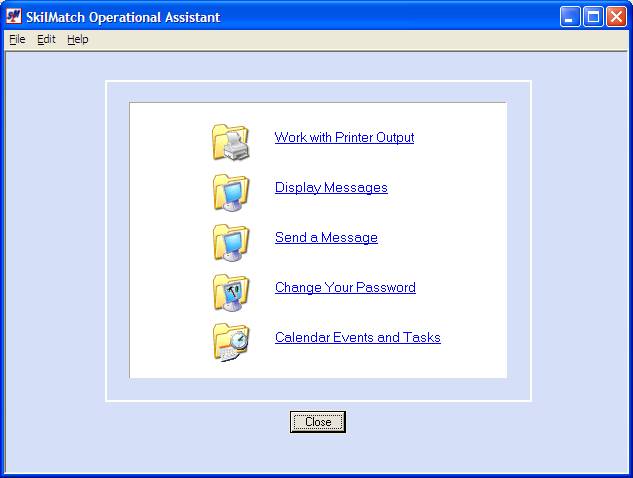
2. The Attention Menu (SkilMatch Operational Assistant) will appear. Click [Calendar Events and Tasks].

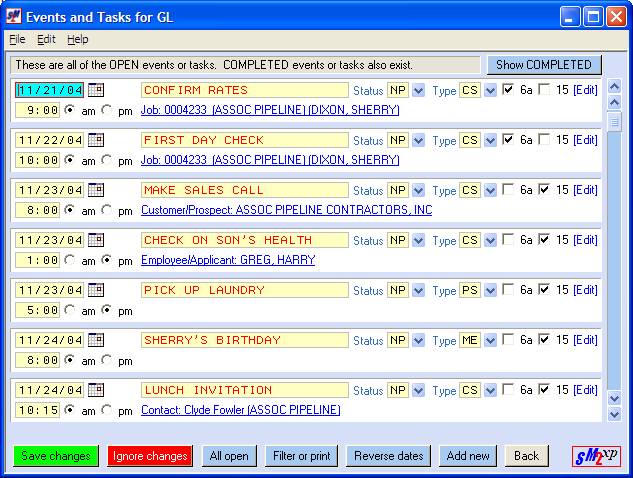
3. The SCS Events and Tasks Screen will appear.

Take note of the following:
(1) The SCS Events and
Tasks Screen shows all “open” (not “completed”) events and tasks for the signed
on user. The items are listed in
chronological order with the oldest date first. Typically, if you are maintaining your SCS properly, the first
item should be an item for today.
However, if there are uncompleted items from a previous date, those
items will be displayed before today’s items.
(2) Each event or task
shows the task description, a hotlink to
the SkilMatch file associated with the event or task (if not a personal event
or task) and all of the basic information about the event or task.
(3) You may click on [Reverse dates] to reverse the dates (reverse
chronological order) and show the item with the most future date first. [Reverse
dates] is a “toggle” between chronological order and reverse
chronological order for all open items or for a filtered display of items.
(4) If you have “completed”
items, the screen will indicate that completed items exist and will provide a [Show COMPLETED] button to view those items.
(5) You may change any item
on this screen by tabbing or clicking to the field you wish to change. Once you have changed all the fields you
wish to change, click [Save changes]
to permanently save the changes. If you
have changed any dates, the screen will re‑display, taking into
consideration the new dates for order purposes. If, after you have keyed changes (but have not SAVED the
changes), you wish to cancel the changes, click [Ignore
changes] to re‑display the screen without your keyed
changes.
(6) You may display or
change any item in “full screen” by clicking [Edit]
next to the item you wish to display or change.
(7) You may “filter” the
display of items (select by dates, type, status) or you may print a filtered
calendar by clicking [Filter or print].
(8) You may manually add an
event or task by clicking [Add new].
(9) If you have displayed a
filtered list of items, you may display all open items in chronological order
by clicking [All open].
CALENDAR “FILTERING”: VIEWING AND
PRINTING
You may want to display or print
only today’s items. You may want to
display items scheduled for a specific day in the future. You may want to display or print all items
for the week. You may want to display
or print only items of a certain type or status. Filtering allows all of these options.
To filter and then display or print:
1. Display your calendar.
2. Click [Filter or print]. The Events and Tasks Filter Screen will appear.

3. To display just today’s open
items, simply click [Display using this filter]
since the SCS assumes you want to display just today’s items and has inserted
everything necessary for that request.
The calendar will re-display with just today’s items.
4. To print just today’s open
items, simply click [Print using this filter]
since the SCS assumes you want to print just today’s items and has inserted
everything necessary for that request.
The calendar will print to your outq with just today’s items.
Note the other date range
possibilities on the filter display.
Note that you may display
or print one item “type” and/or one item “status” and that you may prompt for
type and status.
Prompting when ALL is showing will display all valid
choices. If you prompt for choices with
any other letter+blank showing (like “GG”),
you will be shown all valid choices that start with that letter.
CALENDAR “GO TO FILE TO PERFORM EVENT OR
TASK”
When displaying the SCS calendar
with or without filtering, each event or task has a hotlink
to the SkilMatch file associated with the event or task (if not a personal
event or task) so that you can go directly from the calendar to the file where
the event or task is to be “performed”. The hotlink is blue and underlined and includes the kind of file
and other pertinent information (like customer name, employee name, job number,
vendor).

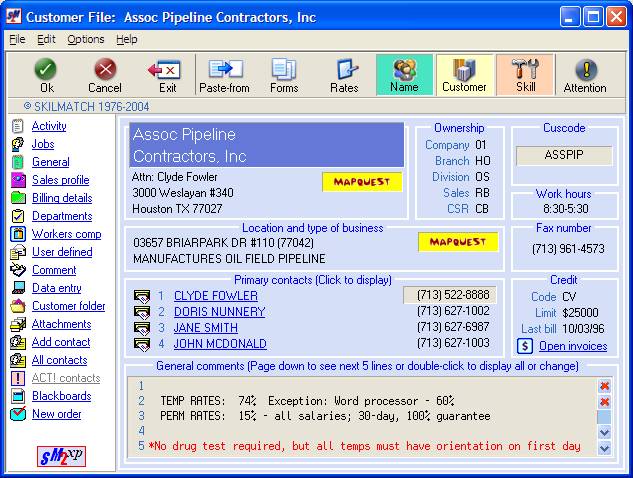
1. To “perform” a task associated with a file,
click the [hotlink] for the event or
task on the calendar. (For this documentation
example the third item, “Customer/Prospect: ASSOC PIPELINE CONTRACTORS, INC”,
hotlink is being selected.)
2. The associated file (employee, customer,
contact, job, vendor) will be displayed.
Perform the event or task and add any
necessary comments and/or schedule any new events or tasks required. Then “exit” the file.
3. The Event or Task Completion Verification Screen
will appear asking if the event or task is completed. Select “No” if the event or task
is not completed. Select “Yes” if the
event or task is completed. Then click [Continue]. If the event or task was not completed, the
event or task will remain on the “open” calendar screen. If the task was completed, the task will
have its status changed by the SCS to “#D” (completed) and will be removed from
the “open” calendar screen. The item
will still be viewable on the “completed” calendar screen. “Completed” items can be “reactivated” by
changing the status to a valid status other than “#D”.

MANUAL SCHEDULING: PERSONAL EVENTS OR TASKS
(review PROMPTED
SCHEDULING FOR ACTIONS first)
Access your SCS calendar:
1. Click the ![]() button in the top right corner of any menu
screen or select File> Attention program
from the menu bar on most SkilMatch screens.
button in the top right corner of any menu
screen or select File> Attention program
from the menu bar on most SkilMatch screens.
2. The Attention Menu (SkilMatch Operational Assistant) will appear. Click [Calendar Events and Tasks].
3. The SCS Events and Tasks Screen will appear.

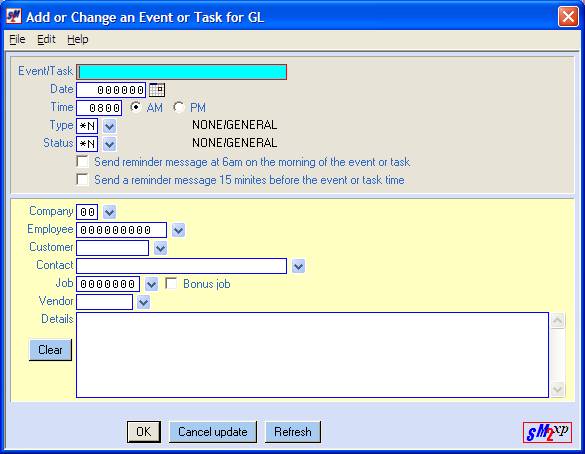
4. Click [Add new]. The Add or Change an Event or Task Screen will appear.
Take note of the following:
(1) The SCS screen is
basically empty and the cursor is positioned at Event/Task.
(2) The SCS requires you to
key a “Task”.
(3) The SCS requires you to
key a “Date”.
(4) The SCS has inserted a
default time of 8:00 am (but can be changed if desired).
If or when you change the time, be sure you also change the AM or PM, when appropriate, to coordinate with the new time. (If you change the time from 8:00 to 2:00, and do not change AM to PM, your time will be 2:00am! This will, of course, affect the position of the event or task on your calendar and will also affect reminder message sending.)
(5) The SCS has inserted a
“Type” of *N (but can be changed if desired).
If *N (None/General) is a valid choice for your organization, you do not need to change it, but you may if other choices are available. If you prompt for another choice with *N showing, you will be shown all valid choices. If you prompt for another choice with any other letter+blank showing (like “GG”), you will be shown all valid choices that start with that letter. If *N is not a valid choice, you will be required to select a valid choice before you leave this screen.
(6) The SCS has inserted a
“Status” of *N (but can be changed if desired).
If *N (None/General) is a valid choice for your organization, you do not need to change it, but you may if other choices are available. If you prompt for another choice with *N showing, you will be shown all valid choices. If you prompt for another choice with any other letter+blank showing (like “GG”), you will be shown all valid choices that start with that letter. If *N is not a valid choice, you will be required to select a valid choice before you leave this screen.
(7) The SCS assumes you do
not want a reminder break message sent at 6 am on the morning of the event or
task (but can be changed if desired).
Checking this option will cause
a message to be in your messages when you sign on in the morning.
(8) The SCS assumes you do
not want a reminder message sent 15 minutes before the scheduled event or task
time (but can be changed if desired)
Checking this option will cause
a message to “pop up” on your screen approximately 15 minutes before time of
the event or task. If you are not
signed on at the time the message is sent, the message will be in your messages
the next time you sign on.
(9) All of the fields in
the yellow section are blank. For
adding personal events and tasks, the ONLY
field in the yellow area into which you should key is “Details” to (optionally)
further describe the personal event or task.
Personal events or tasks
are not associated with a SkilMatch company number, customer, employee, job,
contact or vendor.
3. When the data on the screen
is as you want it to be, click [OK] to
add this event or task to the SCS.
If the SCS detects anything that
is invalid on the screen, a message will be displayed near the bottom of the
screen and you will have the opportunity to correct the problem. After the problem has been corrected, click [OK] to add the event or task.
If you do not want to schedule this personal event or task, click [Cancel update] to cancel the event or task entry.
MANUAL SCHEDULING: BUSINESS EVENTS OR
TASKS ASSOCIATED WITH A SKILMATCH FILE
(review PROMPTED
SCHEDULING FOR ACTIONS first)
MANUALLY
ADDING AN EVENT OR TASK ASSOCIATED WITH A SKILMATCH FILE IS NOT RECOMMENDED
UNLESS ABSOLUTELY NECESSARY. Entry time
is SLOWER and possibilities for MISTAKES are greater.
Access your SCS calendar:
1. Click the ![]() button in the top right corner of any menu
screen or select File> Attention program
from the menu bar on most SkilMatch screens.
button in the top right corner of any menu
screen or select File> Attention program
from the menu bar on most SkilMatch screens.

2. The Attention Menu (SkilMatch Operational Assistant) will appear. Click [Calendar Events and Tasks].

3. The SCS Events and Tasks Screen will appear.

4. Click [Add new]. The Add or Change an Event or Task Screen will appear.

Take note of the following:
(1) The SCS screen is
basically empty and the cursor is positioned at Event/Task.
(2) The SCS requires you to
key a “Task”.
(3) The SCS requires you to
key a “Date”.
(4) The SCS has inserted a
default time of 8:00 am (but can be changed if desired).
If or when you change the time, be sure you also change the AM or PM, when appropriate, to coordinate with the new time. (If you change the time from 8:00 to 2:00, and do not change AM to PM, your time will be 2:00am! This will, of course, affect the position of the event or task on your calendar and will also affect reminder message sending.)
(5) The SCS has inserted a
“Type” of *N (but can be changed if desired).
If *N (None/General) is a valid choice for your organization, you do not need to change it, but you may if other choices are available. If you prompt for another choice with *N showing, you will be shown all valid choices. If you prompt for another choice with any other letter+blank showing (like “GG”), you will be shown all valid choices that start with that letter. If *N is not a valid choice, you will be required to select a valid choice before you leave this screen.
(6) The SCS has inserted a
“Status” of *N (but can be changed if desired).
If *N (None/General) is a valid choice for your organization, you do not need to change it, but you may if other choices are available. If you prompt for another choice with *N showing, you will be shown all valid choices. If you prompt for another choice with any other letter+blank showing (like “GG”), you will be shown all valid choices that start with that letter. If *N is not a valid choice, you will be required to select a valid choice before you leave this screen.
(7) The SCS assumes you do
not want a reminder break message sent at 6 am on the morning of the event or
task (but can be changed if desired).
Checking this option will cause
a message to be in your messages when you sign on in the morning.
(8) The SCS assumes you do
not want a reminder message sent 15 minutes before the scheduled event or task
time (but can be changed if desired)
Checking this option will cause
a message to “pop up” on your screen approximately 15 minutes before time of
the event or task. If you are not
signed on at the time the message is sent, the message will be in your messages
the next time you sign on.
(9) All of the fields in
the yellow section are available for entry.
To associate this event or task with a SkilMatch file, key or prompt for
the file desired. Only ONE file can be selected for association.
(10) You may key any information
desired into “Details” to (optionally) further describe the event or task.
3. When the data on the screen
is as you want it to be, click [OK] to
add this event or task to the SCS.
If the SCS detects anything that
is invalid on the screen, a message will be displayed near the bottom of the
screen and you will have the opportunity to correct the problem. After the problem has been corrected, click [OK] to add the event or task.
If you do not want to schedule this event or task, click [Cancel update] to cancel the event or task entry.
MANUALLY CLOSING AN EVENT OR TASK
Any event or task may be manually “completed” or closed by changing its status to “#D”.
Changing the status to “#D” also
disables any unsent requested reminder messages.
Changing the status to “#D”
removes the item from the “open” calendar and moves it to the “completed”
calendar.
Any “completed” event or task
may be “reactivated” by changing its status to something other than “#D”.
GENERAL FIELD DESCRIPTIONS AND
INFORMATION FOR EVENT OR TASK DATA ENTRY SCREEN

TASK
Key up to 25 characters to describe the event or task.
DATE
Key
the 6-digit date of when to schedule the event or task, or click the ![]() button to select the
schedule date of the event or task.
button to select the
schedule date of the event or task.
TIME, AM/PM
SCS defaults to 8:00 AM. Accept the default or key the 12-hour clock
time of when the task should take place.
Select AM or PM for this time.
If or when you change the time, be sure you also change the AM or PM, when appropriate, to coordinate with the new time. (If you change the time from 8:00 to 2:00, and do not change AM to PM, your time will be 2:00am! This will, of course, affect the position of the event or task on your calendar and will also affect reminder message sending.)
TYPE
SCS defaults to *N. Accept the default (see below) or key a
valid event or task type, or click the ![]() button to display a
list of valid type choices from which to select.
button to display a
list of valid type choices from which to select.
If *N (None/General) is a valid choice for your organization, you do not need to change it, but you may if other choices are available. If you prompt for another choice with *N showing, you will be shown all valid choices. If you prompt for another choice with any other letter+blank showing (like “GG”), you will be shown all valid choices that start with that letter. If *N is not a valid choice, you will be required to select a valid choice before you leave this screen.
STATUS
SCS defaults to *N. Accept the default (see below) or key a
valid event or task status, or click the ![]() button to display a
list of valid status choices from which to select.
button to display a
list of valid status choices from which to select.
If *N (None/General) is a valid choice for your organization, you do not need to change it, but you may if other choices are available. If you prompt for another choice with *N showing, you will be shown all valid choices. If you prompt for another choice with any other letter+blank showing (like “GG”), you will be shown all valid choices that start with that letter. If *N is not a valid choice, you will be required to select a valid choice before you leave this screen.
SEND REMINDER MESSAGE(S)
There are four choices for the timing and delivery of reminder messages. The reminder message is in the form of a system message to your first sign on session.
·
6 AM the day of the event or task: If you schedule this reminder
time, the message will be displayed with your other messages when you sign on
anytime after 6:00 AM the day of the event or task.
·
15 minutes before the event or task time: If you schedule this reminder
time, the message will “break” (pop up) on your first sign on session
approximately 15 minutes prior to the event or task scheduled time.
·
6 AM the day of the event or task AND 15 minutes
before the event or task time: You can
schedule both reminders to occur.
·
No reminders at all: You can choose not to schedule any reminders of
this event or task.
When an event or task date or
time is manually changed, reminder message scheduling is reset based on the
change.
COMPANY
Use this field only when you are
manually entering a business event or task associated with a SkilMatch
file. Key a valid company number or
select a valid company number by clicking the ![]() button. This field is required for all SkilMatch
files except Vendor files.
button. This field is required for all SkilMatch
files except Vendor files.
EMPLOYEE
Use this field only when you are
manually entering a business event or task associated with a SkilMatch employee
file. Key a valid social security
number or click the ![]() button to select an
employee using the SkilMatch Name Search:
Find the employee’s primary screen, exit the Name Search, and the
employee’s social security number will be returned to the data entry screen.
button to select an
employee using the SkilMatch Name Search:
Find the employee’s primary screen, exit the Name Search, and the
employee’s social security number will be returned to the data entry screen.
CUSTOMER
Use this field only when you are
manually entering a business event or task associated with a SkilMatch customer
file or a customer contact file. Key a
valid customer code or click the ![]() button to select a
customer using the SkilMatch Customer Search:
Find the customer’s primary screen, exit the Customer Search, and the
customer’s code will be returned to the data entry screen.
button to select a
customer using the SkilMatch Customer Search:
Find the customer’s primary screen, exit the Customer Search, and the
customer’s code will be returned to the data entry screen.
CONTACT
Use this field only when you are
manually entering a business event or task associated with a SkilMatch customer
contact file. Key a valid customer
contact name or click the ![]() button to select a
customer contact using the SkilMatch Customer Search: Find the customer contact’s primary screen, exit the Customer
Search, and the customer contact’s name will be returned to the data entry
screen.
button to select a
customer contact using the SkilMatch Customer Search: Find the customer contact’s primary screen, exit the Customer
Search, and the customer contact’s name will be returned to the data entry
screen.
JOB
Use this field only when you are
manually entering a business event or task associated with a SkilMatch job
file. Key a valid job number or click
the ![]() button to select a
job using the SkilMatch Customer Search:
Find the job in the customer’s file, display the primary job detail
screen, exit the Customer Search, and the job number will be returned to the
data entry screen.
button to select a
job using the SkilMatch Customer Search:
Find the job in the customer’s file, display the primary job detail
screen, exit the Customer Search, and the job number will be returned to the
data entry screen.
VENDOR
Use this field only when you are
manually entering a business event or task associated with a SkilMatch vendor
file. Key a valid vendor code or click
the ![]() button to select a
vendor using the SkilMatch Vendor Search:
Find the vendor’s primary screen, exit the Vendor Search, and the
vendor’s code will be returned to the data entry screen.
button to select a
vendor using the SkilMatch Vendor Search:
Find the vendor’s primary screen, exit the Vendor Search, and the
vendor’s code will be returned to the data entry screen.
DETAILS
This area allows 15 lines of
data entry to describe or elaborate details of the event or task.
Click [OK] to add this event or task.
Click [Cancel update] to return to the calendar
without adding this event or task.
Click [Refresh] to view or verify the current
responses on this event or task.
GENERAL FIELD DESCRIPTIONS AND
INFORMATION FOR FILTERING SCREEN
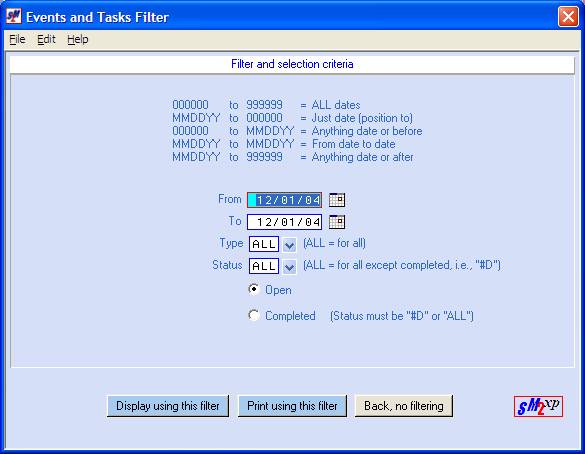
FROM
SCS defaults to today’s
date. Key the date of the first task
date you want to see, or click the ![]() button to select the
date of the first task date you want to see.
Key all 000000s to let the system select the oldest event or task date
for you.
button to select the
date of the first task date you want to see.
Key all 000000s to let the system select the oldest event or task date
for you.
TO
SCS defaults to today’s
date. Key the date of the last task
date you want to see, or click the ![]() button to select the
date of the last task date you want to see.
Key all 999999s to let the system select the most future event or task
date for you.
button to select the
date of the last task date you want to see.
Key all 999999s to let the system select the most future event or task
date for you.
TYPE
SCS defaults to ALL task type choices. If you want to see a single task type, click
the ![]() button to display a
list of all choices.
button to display a
list of all choices.
If you prompt for another choice with ALL showing, you will be shown all valid choices. If you prompt for another choice with any other letter+blank showing (like “GG”), you will be shown all valid choices that start with that letter.
STATUS
SCS defaults to ALL task status
choices. If you want to see a single
task status, click the ![]() button to display a
list of all choices.
button to display a
list of all choices.
If you prompt for another choice with ALL showing, you will be shown all valid choices. If you prompt for another choice with any other letter+blank showing (like “GG”), you will be shown all valid choices that start with that letter.
If you want to see “completed” tasks only, then you must leave “ALL” in this field or key “#D” and then select “completed” below.
OPEN
SCS defaults to “open”. If you want to see open tasks, leave this
selection.
COMPLETED
(Status, above, must be “#D” or
“ALL”)
If you want to see completed
tasks, rather than open tasks, then make this selection. If you did not select either “ALL” or “#D”
as the status, an error message will display.
If you want to display events
and tasks using the selected filters, click [Display using this filter].
If you want to print events and
tasks using the selected filters, click [Print using this filter].
If you want to return to the
previous screen and not display or print using filtering, click [Back, no filtering].