INTRODUCTION TO THE NAME SEARCH
Once
you have located someone's personnel file, you can display, work with and
change many details associated with the person.
The
following is a list of the different features described in this documentation:
Locate a person’s file
Indicate a person is available today
Indicate a person is available in
the future
Indicate a person is unavailable
View the
person’s skills
View the person’s general comments.
Personnel Activity Comments
View all comments (except “changes
to file” comments)
View a selected comment type only
View a selected comment group only
Omit a selected comment type from
view
Omit a selected comment type group
from view
View “changes to file” comments only
Add a comment that is 1-15 lines
long, optionally pre-formatted
Add a comment that is more than 15
lines long, no pre-formatting
Add a comment and update a person’s
availability at the same time
Job Assignment History
View job assignment summary
View job detail
View supplementary job detail
Make changes to
jobs/schedule “ticklers”
Add/change Last Action Date, Next
Action Date, or End Date
Add/change Last Action Type or Next
Action Type
Change End Date Status
Add/change QC Evaluation Type
Add/change QC Comment
Add/change an Accounting Note
Refer to
document Menu
CHANGE, Item Job Order
Job Activity Comments
View all comments (except “changes
to file” comments)
View a selected comment type only
View a selected comment group only
Omit a selected comment type from
view
Omit a selected comment type group
from view
View “changes to file” comments only
Add a comment that is 1-15 lines
long, optionally pre-formatted
View general comments
Change general comments
Add general comments with optional
pre-formatting
View and print a person’s paycheck
history.
View eligibility toward various
bonus plans.
Images
and documents: view, fax, and print résumés, images and other
documents.
View a resume image
View a resume document
View, fax, or print other documents
or images
Make changes to the personnel file.
Calculate a bill rate
Calculate a pay rate
Calculate a gross margin
View detailed rate analysis
Access personal or company-wide
"blackboards".
Access the Customer Search function.
Access the Skill Search function.
To
begin, on the “Operations Area Searches” menu, click [Name Search].
The
screen will display:
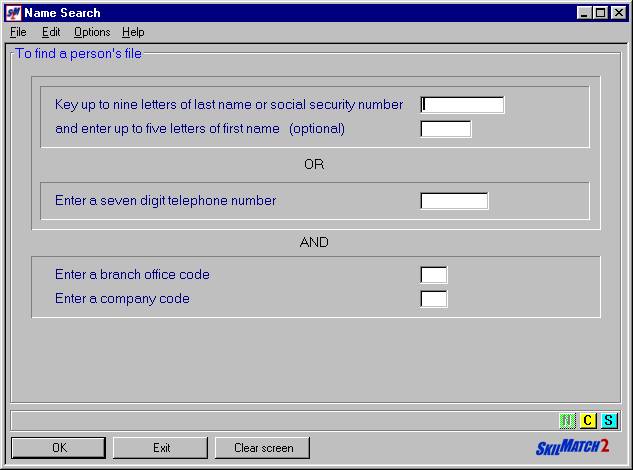
(Click “Options” or <RIGHT-CLICK> on the screen to see options and shortcut keys)
Last name:
Key a
few letters of the person's last name.
It is not necessary, nor desirable, to key the entire last name.
Only key
those letters of which you are sure.
Press
the <TAB>
key for additional keying or click [OK] to search.
First name:
It is
not necessary to search for part of a first name. Doing so, however, will reduce the number of people selected or
may take you directly to a person's personnel file.
You may
key up to five letters of the person's first name.
Press
the <TAB>
key for additional keying or click [OK] to search.
OR
Record number:
If you know
it, key the person's record number (usually the social security number) without
dashes.
Press
the <TAB>
key for additional keying or click [OK] to begin the search.
OR
Telephone number:
If you
know it, key the person's seven-digit telephone number without the area code or
dashes.
Press
the <TAB>
key for additional keying or click [OK] to begin the search.
Branch:
The
system will always select people who belong to the branch which has been
defined, by security, as your usual branch.
To
search a different, authorized branch, key over the branch displayed.
Note: if
you key a person’s record number and if that person’s record number exists in a
company/branch to which you are authorized, the person’s record will be
displayed even if the record exists in a branch different than what you have
requested. This is only true when keying an exact record number.
Press
the <TAB>
key for additional keying or click [OK] to begin the search.
Company:
The
system will always select people who belong to the company which has been
defined, by security, as your usual company.
To
search a different, authorized company, key over the company displayed.
Press
the <TAB>
key for additional keying or click [OK] to begin the search.
When all
keying is complete, click [OK] to search.
One of four results will occur:
(1) Multiple selections:
The
system locates several people who meet the criteria keyed.
The
screen will display:
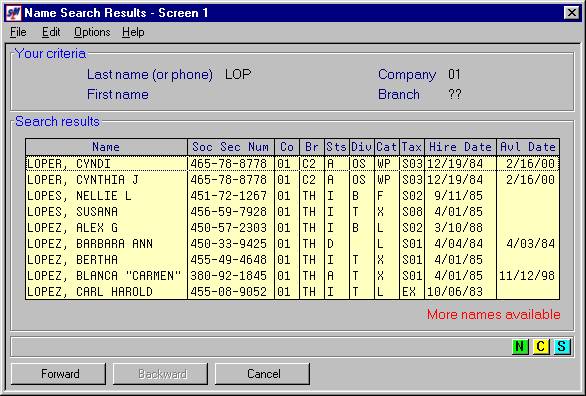
(Click “Options” or <RIGHT-CLICK> on the screen to see options and shortcut keys)
You may
choose to start over or to end the Name Search function. Click ![]() or [Cancel] to start over, or click [Exit] to
return to the menu or a previous function.
or [Cancel] to start over, or click [Exit] to
return to the menu or a previous function.
To
select one of the people displayed, use your mouse to <DOUBLE-CLICK>
on the name.
If you
do not see the person you need and the screen displays, in red, "More
names available", you may move to the next group of names by clicking on [Forward]
or by pressing the <PAGE DOWN> key.
If you pass a screen of names and want to go
back, you may click [Backward] or
press the <PAGE
UP> key.
When the
system has displayed all choices, it will display, in red, "No other
names".
(2) File not found:
The
system does not locate a person based on the criteria keyed.
The
screen will display:
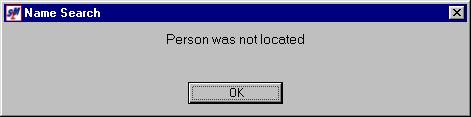
This may
be due to misspelling the person's name, so do not key more letters of a name
than those of which you are sure.
Click [OK]
to try again.
(3) Error message:
One or
more people are found, but belong to a company number or to a branch which is
not the same as the keyed information or to a company or branch to which you
are not authorized.
The
screen will display:
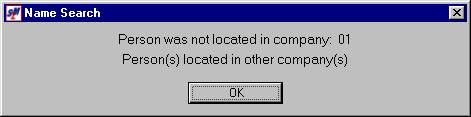
or
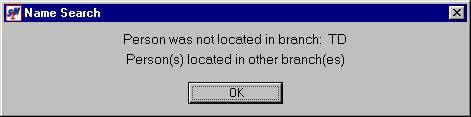
or
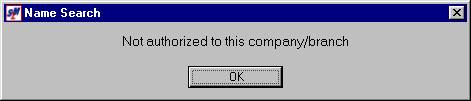
Check
with your supervisor if you need additional authorization.
Click [OK]
to try again.
(4) Person located:
The
system locates only one person who matches the criteria you keyed.
The
screen will display:
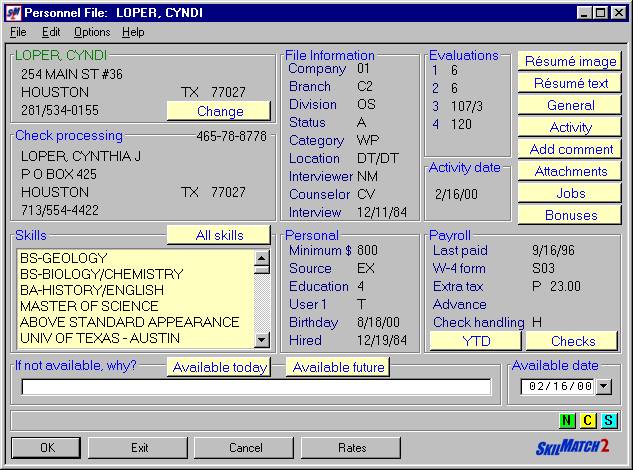
(Click “Options” or <RIGHT-CLICK> on the screen to see options and shortcut keys)
This is the personnel file “front”
screen.
You may
choose to start over or to re-select from a list or to end the search. Click ![]() to start over, click [Cancel] to ignore your
selection and return to the list of names from which the person was selected,
if there was a list, or click [Exit] to return to the menu or a previous
function.
to start over, click [Cancel] to ignore your
selection and return to the list of names from which the person was selected,
if there was a list, or click [Exit] to return to the menu or a previous
function.
Once a
personnel file is displayed, these are the options:
The following sections explain “how
to” perform functions within the Name Search and are documented as if the
functions are requested from the personnel file “front” screen. However, these options are generally
available throughout all of the Name Search screens by using the <RIGHT-CLICK> of a mouse to display options or by clicking a yellow
or gray direct access button, when available.
Understanding the <RIGHT-CLICK> method of getting to options is
important to your best, most productive utilization of the SkilMatch2 product.
The SkilMatch2 system
assumes you will be checking or verifying availability information every time
you speak with a person who is in the system.
The process to track availability is simple, yet powerful. Frequently verifying availability keeps
information fresh and should make you and your co-workers more productive.
- When
someone tells you that they are available today, make him “available today”.
- When
you assign someone to a job, make him “available in the future” (at the end of
his assignment).
- When
someone is sick, make him “available in the future” (at an anticipated recovery
date).
- When
someone tells you they are on assignment through another service, make him
“available in the future” (at the end of his assignment).
- When
someone moves out of town, make him “unavailable” and change his file Status
(assuming you do not have a branch in his new city).
"If not available, why?” line
(also known as the “NA” line):
If a
person is available, this line should, generally, be BLANK. (You may also choose to have information on
this line which might restrict someone’s availability such as: “on
vacation”, “won the lottery; taking a month off”, “surgery”, and so
forth).
If the
person is not available for work, this line should indicate the reason for
non-availability and, perhaps, additional, important information such as: “On
assignment at Exxon, 713 688-9876 x 456”, “Working for Manpower at IBM, 713 887-6789”,
“On vacation in Hawaii”, “Sick, has flu, call on Monday, 7/15”, and so
forth.
Anything
keyed on the NA line also becomes a permanent Activity Comment in a person’s
file each time the line is changed. The
comment is dated, timed and shows the user who changed the NA line.
Available date:
This
date should reflect the next date this person will be available for work based
on a conversation with the person or other valid information.
The
available date may be keyed (without punctuation) or may be selected by
clicking the ![]() button (prompt and select button) to the
right of dates throughout SkilMatch2. The
button (prompt and select button) to the
right of dates throughout SkilMatch2. The ![]() button will display a calendar from which you
may click on a date to select, and then click [OK] to key the date.
button will display a calendar from which you
may click on a date to select, and then click [OK] to key the date.

How to indicate a person is available today:
Delete
the information on the “If not available, why?” line, then click [Available today]. You will be returned to the Name Search request screen.
This
action: (1) will change the both the Activity Date and the Availability Date to
today's date and (2) will add an “Available today” dated and timed comment to
the Activity Comment screen, showing the user who changed the availability.
How to indicate a person is available in the future:
Click [Available future].
The
screen will display:
(Click “Options” or <RIGHT-CLICK> on the screen to see options and shortcut keys)
This
dialog box prompts you to key an available date (without punctuation) or to
select a date using the calendar function ![]() described above.
described above.
It also
prompts you to key the reason for non-availability on the NA line.
Click [OK]
when finished and you will be returned to the Name Search request screen.
This
action: (1) will change the Availability Date to the date keyed, (2) will
change the Activity Date to today's date, and (3) will add a dated and timed
comment to the Activity Comments screen, showing the user who changed the
availability. The information keyed on
the NA line will remain the same until changed.
How to indicate a person is unavailable:
If a
person is unavailable temporarily, follow the same procedure as in “future”
availability, above, using the anticipated available date.
If a
person is unavailable permanently, you may need to change the person’s
personnel file status (please refer to document Menu
CHANGE, Item Employee or document Menu
CHANGE, Item Applicant).and leave the available date blank.
This
action: (1) will change the Availability Date to the date keyed, so that when
dates are used for Skill Searches, this person will not be selected if the
available date falls outside the range used, (2) will change the Activity Date
to today's date and (3) will add a dated and timed comment to the Activity
Comments screen.
Up to 6
skills will automatically be displayed from the front screen of the personnel
file.
To view
additional skills on the personnel front screen, you may use the scroll bar.
OR
Click [All skills]
to display all skills on a full screen.
The
screen will display:

(Click “Options” or <RIGHT-CLICK> on the screen to see options and shortcut keys)
When you
have finished viewing the person’s skill set, click [Return] to return to the personnel
front screen.
To view
activity comments, click [Activity]. To add activity comments, click [Add comment]. For further information, refer to HOW TO VIEW
ACTIVITY COMMENTS or HOW TO ADD ACTIVITY
COMMENTS presented later in this document.
To view
the General Comments, click [General].
The
screen will display:
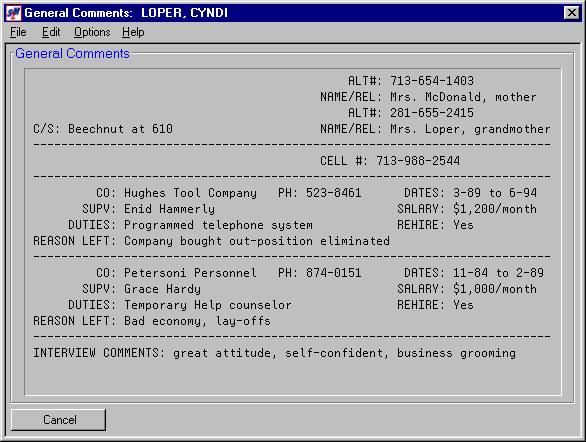
(Click “Options” or <RIGHT-CLICK> on the screen to see options and shortcut keys)
Click [Cancel]
to return to the personnel file front screen.
To make
changes to the General Comment screen, refer to document Menu
CHANGE, Item Employee or document Menu
CHANGE, Item Applicant.
To view
the Activity Comments, click [Activity].
The
screen will display:
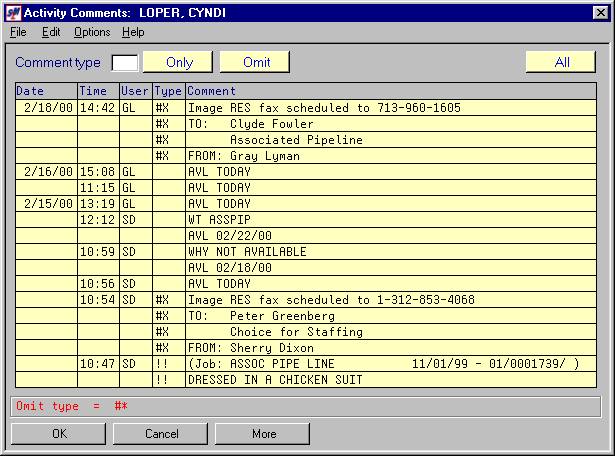
(Click “Options” or <RIGHT-CLICK> on the screen to see options and shortcut keys)
(In
addition to the comments which are added by users, the system keeps track of
all permanent data entry changes on the personnel file: Every time the file is changed through data
entry, a comment is written to the Activity Comment screen. It is dated and timed, shows the user making
the change, and shows what the information was before and after the change. These comments are designated as “changes to
file” comments and have a special comment type of “#*”.)
There are six ways to view Activity
Comments:
(1) View all comments (except
"changes to file” comments):
After
you have clicked on [Activity], the system will display every
comment except “changes to file” comments.
Each comment is displayed, along with the type of comment, date, time
and a notation of the user who made the comment. The comments display in chronological order, with the most recent
comment first.
(2) View a selected comment type
only:
After
you have clicked on [Activity], to view only a specific type of
comment, key the two‑character comment type at the top of the screen and
click [Only].
OR
After
you have clicked on [Activity], <RIGHT-CLICK> on a
displayed comment and select “View comments of this type”.
OR
<DOUBLE-CLICK> on any displayed comment
to display only comments of that type.
The
system will display only the comments of the type selected, in chronological
order, with the most recent comment of that type first.
(3) View a selected comment group
only:
It is
possible to have comment type "groups", that is, two or more comment
types that share the same first character.
For instance, Workers’ Comp/1st Notification (“W1”), Workers’ Comp/2nd
Follow-up (“W2”) and Workers’ Comp/Final Results (“WF”).
You can
view a specific "group" of comments by ignoring the second character
when you want to view them.
To view
only a specific group of comments, key the first character of the comment group
followed by a “?” at the top of the screen and click [Only].
The
system will display only the comments from the group keyed, in chronological
order, with the most recent comment of those types first.
(4) Omit a selected comment type:
After
you have clicked on [Activity], to omit viewing a specific type of
comment, key the two‑character comment type at the top of the screen and
click [Omit].
OR
After
you have clicked on [Activity], <RIGHT-CLICK> on a
displayed comment and select “Omit comments of this type”.
The
system will display all comments except the type keyed or selected and the
“changes to file” comments, in chronological order, with the most recent
comment first.
(5) Omit a selected comment type
group:
You can
omit viewing a specific "group" of comments by ignoring the second
character when you want to exclude them.
After
you have clicked on [Activity], to omit a specific group of
comments, key the first character of the comment group followed by a “?” at the
top of the screen and click [Omit].
The
system will display all comments, omitting the group type keyed and the
“changes to file” comments, in chronological order, with the most recent
comment first.
(6) View “changes to file” comments
only:
After
you have clicked on [Activity], to view only the “changes to file”
comments, key “#*” the top of the screen and click [Only].
The
system will display only the “changes to file” comments, in chronological
order, with the most recent “changes to file” comment first.
There
are three ways to add an activity comment.
One way allows comments of from one to fifteen lines, unformatted. You may enter from one to fifteen lines,
pre-formatted, so that everyone in your organization enters a certain type of
comment in the same manner. The third
option has no restriction on number of lines, but cannot be pre-formatted.
How to add a comment that is 1-15
lines long, optionally pre-formatted:
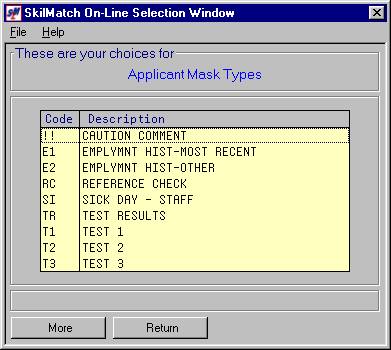
Click [Add comment].
The
screen will display:
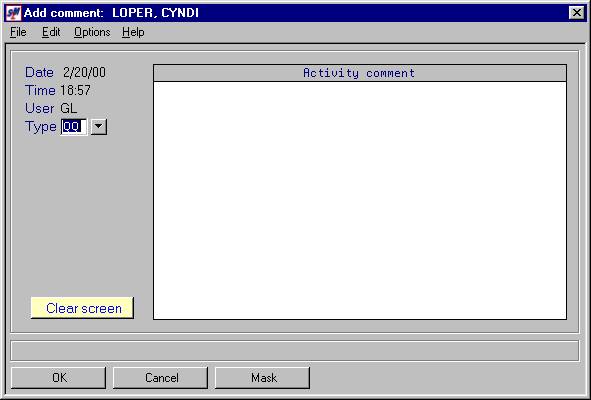
(Click “Options” or <RIGHT-CLICK> on the screen to see options and shortcut keys)
Key a
comment type and press the <TAB> key to advance to the comment
area.
OR
Select a
comment type by clicking the ![]() button (prompt and select button) to the
right of the comment type.
button (prompt and select button) to the
right of the comment type.
The
screen will display:
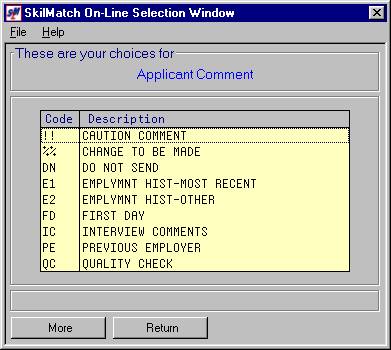
When you
see the comment type you want to use, <DOUBLE-CLICK>
on the comment type and it will be selected and keyed for you. If you do not see the comment type you want,
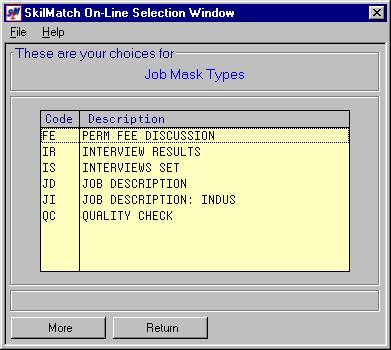
click [More]
to view more available comment types.
When you get to the end, [More] will start the comment types over
again. To not select a comment type,
click [Return]
to return to the Add Comment screen.
After
you have keyed or selected the comment type, press the <TAB> key to advance to
the comment area.
OR
To
select a comment type with a pre-formatted comment area (so that everyone in
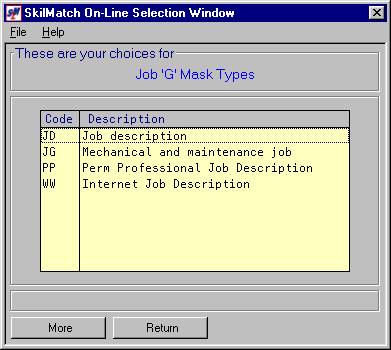
your organization enters a certain type of comment in the same manner), click [Mask].
The
screen will display:
When you
see the mask type you want to use <DOUBLE-CLICK>
on the mask type and you will be returned to the comment area with your cursor
positioned for keying your comment on the formatted screen. If you do not see the mask type you want,
click [More]
to view more available mask types. When
you get to the end, [More] will start the mask types over
again. To not select a mask type, click
[Return]
to return to the Add Comment screen.
Key up
to 15 lines of comment. If you decide
that you want to start over with the comment, click [Clear screen] to clear the
comment type and the comment area, ready to start over. If you decide not to make a comment, click [Cancel]
to return to the personnel file front screen.
When the comment is complete, press [OK] to return to the personnel file front
screen.
How to add a comment that is more
than 15 lines long, no pre-formatting:
Click “Options”
or <RIGHT-CLICK> on the
personnel file front screen. Select
“Add long comment”.
The
screen will display:
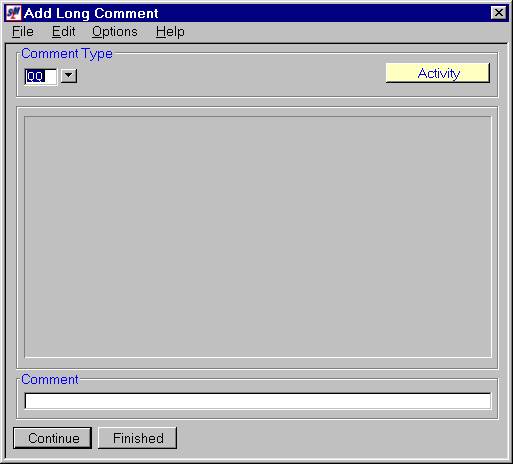
(Click “Options” or <RIGHT-CLICK> on the screen to see options and shortcut keys)
Comment Type:
Defaults
to QQ. If you prefer to enter a
different comment type, key the desired comment type.
OR
Select a
comment type by clicking the ![]() button (prompt and select button) to right of
the comment type. Use the same
procedure as described above for selecting a comment type.
button (prompt and select button) to right of
the comment type. Use the same
procedure as described above for selecting a comment type.
After
you have selected the comment type, press the <TAB> key to advance to
the comment area.
Begin
keying your comment. When you get to
the end of the first line, click [Continue].
The line you just keyed will move to the top of the screen and cannot be
edited. Continue keying your comment,
and continue to click [Continue] to add more lines. If you continue keying so many lines that
the first lines you keyed are no longer displayed, you may click [Activity]
to see the entire comment so far. On
the Activity Comment screen, click [Cancel] to continue your comment. When the comment is complete, click [Finished]. The system will ask you to confirm that you
are finished. Click [Yes]
if you are finished and click [No] to return and continue entering comment
lines.
How to add a comment and update a
person’s availability at the same time:
First,
add the comment (refer to procedures described above on HOW TO ADD
ACTIVITY COMMENTS).
Next, when you have returned to the person’s front screen, update the
person’s availability (refer to HOW TO TRACK AVAILABILITY
described above).
HOW TO WORK WITH JOB ASSIGNMENT
HISTORY
Viewing a job assignment summary:
To view
a person’s job assignment summary history, click [Jobs].
The
screen will display:
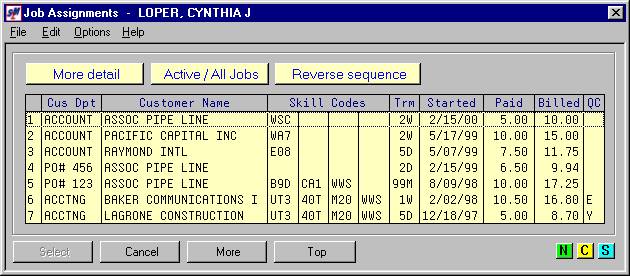
(Click “Options” or <RIGHT-CLICK> on the screen to see options and shortcut keys)
You will
be viewing single-line detail of up to seven of the person's most recent job
assignments. If there are more job
assignments to view, the [More] button will be available. If needed, press [More] to view the next screen
of older job assignments. You may
continue to press [More] until you reach the end of the job assignment
history and the [More]
button is no longer available. Click [Top]
to restart the job assignment summary view at the beginning.
Alternate summary view:
If you
would like to see additional, brief, one-line information about the job
assignments displayed, click [More-detail].
The
screen will display:
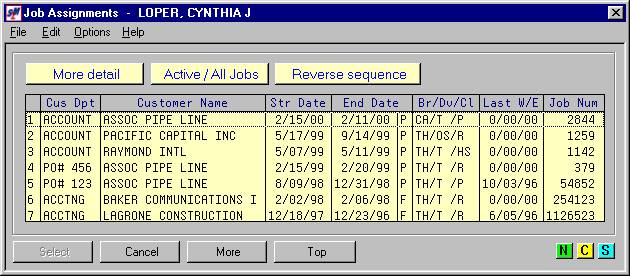
(Click “Options” or <RIGHT-CLICK> on the screen to see options and shortcut keys)
The
system will replace some information with new, different information. The system will retain this "alternate
view" until you click [More detail] again to return to the original
detail, or until you leave the Name Search function completely.
Note:
the [More detail] button is a toggle between
two different screens and may be used as often as necessary.
Viewing only active or all jobs:
To view
only active job assignments, that is, those with a “projected” (P) but not
final (F) end date, click [Active/All jobs]. The system will retain this view until you click [Active/All
jobs] again to return to viewing all job assignments, or until you
leave the Name Search function completely.
Note: the [Active/All
jobs] button is a toggle between two different screens and may be used
as often as necessary.
Viewing newest/oldest jobs first:
The
default view of the job assignment summary history is most recent job assignment,
by start date, first. To view the
oldest job assignment first, click [Reverse sequence]. The system will retain this view until you click [Reverse
sequence] again to return to viewing the most recent job assignment
first, or until you leave the Name Search function completely.
Note:
the [Reverse sequence] button is a toggle
between two different screens and may be used as often as necessary.
Viewing job assignment detail
information:
To
access full information about a job assignment, <DOUBLE-CLICK> on a line
of job assignment summary history.
The
screen will display:
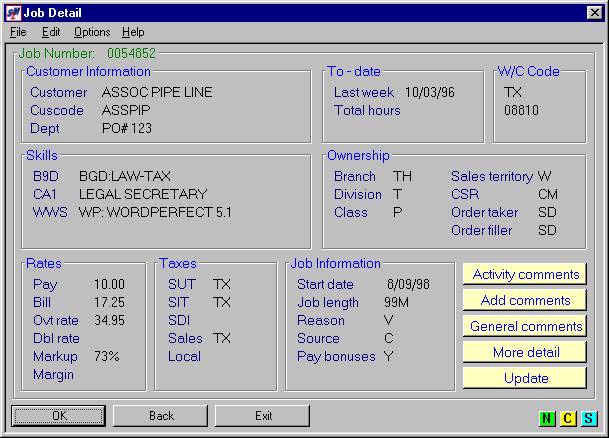
(Click “Options” or <RIGHT-CLICK> on the screen to see options and shortcut keys)
To
return to the person’s job assignment summary history, click [OK] or
[Back]. To return to the personnel file front
screen, click [Exit].
View “supplementary” job assignment
detail:
To see
additional detail associated with this job assignment, click [More detail].
The
screen will display:
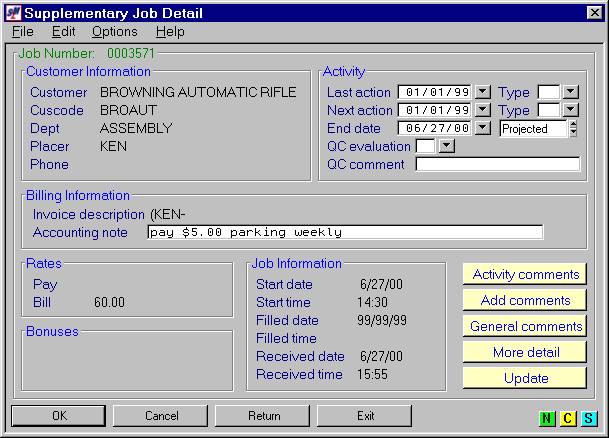
(Click “Options” or <RIGHT-CLICK> on the screen to see options and shortcut keys)
Note:
the [More detail] button is a toggle between
two different screens and may be used as often as necessary.
When
finished viewing the Job Detail and/or Supplementary Job Detail screens, click [OK]
to return to the job assignment summary history list or click [Exit]
to return to the personnel file front screen.
HOW TO CHANGE SUPPLEMENTARY JOB ASSIGNMENT DETAIL:
(The
system keeps track of all permanent data entry changes in a job file: Every time the file is changed through data
entry, a comment is written to the job’s Activity Comment screen. It is dated and timed, shows the user making
the change, and shows what the information was before and after the change. These comments are designated as “changes to
file” comments and have a comment type of “#*”).
While
you are viewing the “Supplementary Job Detail” screen, often-changed details of
the job can be changed without going to the actual full job data entry
screen. These details are:
Last Action Date and Last Action Type
Next Action Date and Next Action Type
End Date and End Date Status
Quality Control (QC) Type and QC Comment
Accounting Note
How to change Last Action Date or
Next Action Date or End Date:
You may <DOUBLE-CLICK> the appropriate date
to highlight the date currently displayed and then key the desired date
(without punctuation). Or, you may
click the ![]() button (prompt and select button) to the
right of dates. The
button (prompt and select button) to the
right of dates. The ![]() button (prompt and select button) will
display a calendar from which you may click on a date to select, and then click
[OK]
to key the date.
button (prompt and select button) will
display a calendar from which you may click on a date to select, and then click
[OK]
to key the date.
Press
the <TAB> key or click on the
desired area for additional keying or click [OK] if you
are finished with changes to and viewing of the screen.
How to change Last Action Type or
Next Action Type:
Click
the ![]() button (prompt and select button) next to the
desired Action Type to view a list of valid Action Types.
button (prompt and select button) next to the
desired Action Type to view a list of valid Action Types.
The
screen will display:
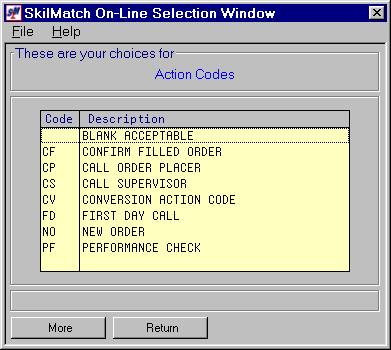
When you
see the Action Type you want to use, <DOUBLE-CLICK> on the
Action Type and it will be selected and keyed for you. If you do not see the Action Type you want,
click [More] to view more available Action
Types. When you get to the end, [More] will start the Action Types over
again. To not select an Action Type,
click [Return].
Press
the <TAB> key or click on the
desired area for additional keying or click [OK] if you
are finished with changes to and viewing of the screen.
How to change End Date Status:
The End
Date Status indicates whether the end date keyed is Projected or Final. A Projected End Date indicates that the
person is still working on an assignment that is projected to end on this
date. A Final End Date indicates that
the assignment has been confirmed as ended.
In general, an End Date should not be “Final” until the assignment has actually
ended.
Click
the ![]() button (prompt and select button) to select a
valid End Date Status or key P for “projected” or F for “final”.
button (prompt and select button) to select a
valid End Date Status or key P for “projected” or F for “final”.
Press
the <TAB> key or click on the
desired area for additional keying or click [OK] if you
are finished with changes to and viewing of the screen.
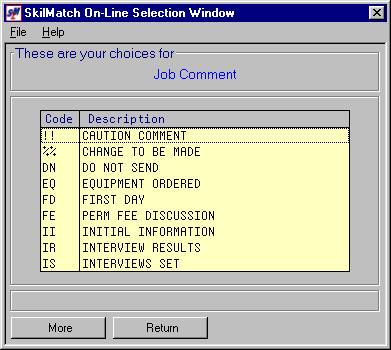
How to select a QC Evaluation Type:
To add a
QC Evaluation Type (Quality Control rating), click the ![]() button (prompt and select button) to see a
list of valid QC Evaluation Types.
button (prompt and select button) to see a
list of valid QC Evaluation Types.
The
screen will display:
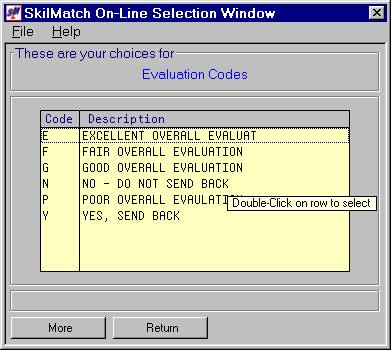
When you
see the QC type you want to use, <DOUBLE-CLICK> on the
QC type and it will be selected and keyed for you. If you do not see the QC type you want, click [More] to view more available QC
types. When you get to the end, [More] will start the QC types over again. To not select a QC type, click [Return].
Press
the <TAB> key or click on the
desired area for additional keying or click [OK] if you
are finished with changes to and viewing of the screen.
How to add a QC Comment:
Key up
to 20 characters to further describe this QC evaluation.
Press
the <TAB> key or click on the
desired area for additional keying or click [OK] if you
are finished with changes to and viewing of the screen.
How to add an Accounting Note:
The
Accounting Note has been designed to allow the front office to communicate with
the payroll-processing department, avoiding verbal communication. Think of this accounting note as a “sticky
note” which imparts such information as “pay overtime after 7 hours each day”,
“deduct $10.00 for safety glasses week-ending 2/25/00”, “credit customer for 4
hours free training”, and so forth.
Key up
to 48 characters.
This
note (1) is added to the job as a change comment for audit trail, (2) will
appear during timesheet entry for your payroll processing staff’s information.
Press
the <TAB> key or click on the
desired area for additional keying or click [OK] if you
are finished with changes to and viewing of the screen.
To make
changes and return to the list of jobs, click [OK].
To make
changes and return to the person’s front screen, click [Return].
To not
make changes and return to the list of jobs, click [Cancel].
To not
make changes and return to the “Operations Area Searches” menu, click [Exit].
Note: Only one person at a time can make changes
to these areas. The system will
automatically block any user from updating a job order if another user has
these changeable areas displayed. If
this happens, the following screen will display:
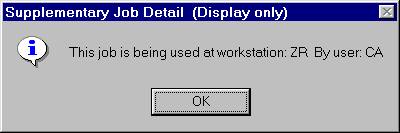
Press [OK] to return to the previous screen. You may update this job when the other user
has finished updating this job.
HOW TO MAKE CHANGES TO A JOB ORDER:
Certain
details of the job can only be changed by going into the actual job data entry
screen. From the Job Detail screen or
Supplementary Job Detail screen, click [Update].
To make
changes to the Job Order, refer to document Menu
CHANGE, Item Job Order.
HOW TO VIEW JOB ACTIVITY COMMENTS
To view
job comments, you must first select the job assignment you wish to work
with. While viewing the Job Assignment
Summary screen, you may:
<DOUBLE-CLICK> on the
desired line of job assignment history and then click [Activity comments].
OR
<RIGHT-CLICK> on any
summary line and select “Activity comments”.
The
screen will display:
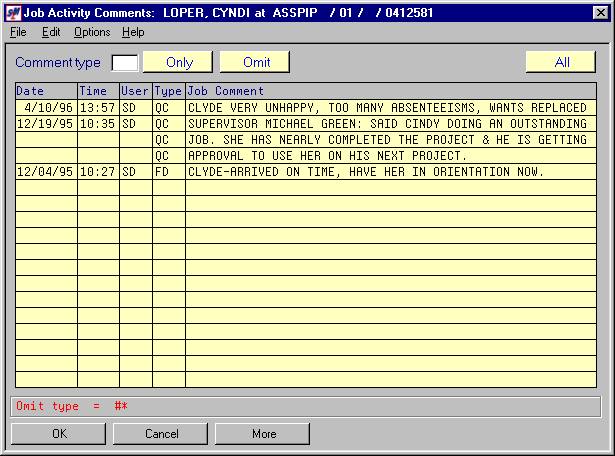
(Click “Options” or <RIGHT-CLICK> on the screen to see options and shortcut keys)
(In addition to the comments which are added by users, the
system keeps track of all permanent data entry changes on a job
assignment: Every time the file is
changed through data entry, a comment is written to the job’s Activity Comment
screen. It is dated and timed, shows
the user making the change, and shows what the information was before and after
the change. These comments are
designated as “Changes to file” comments and have a comment type of “#*”.)
There are six ways to view Job Activity Comments:
(1) View all comments (except
"changes to file” comments):
After
you have clicked on [Activity], the system will display every
comment except “changes to file” comments.
Each comment is displayed, along with the type of comment, date, time
and a notation of the user who made the comment. The comments display in chronological order, with the most recent
comment first.
(2) View a selected comment type
only:
After
you have clicked on [Activity], to view only a specific type of
comment, key the two‑character comment type at the top of the screen and
click [Only].
OR
After
you have clicked on [Activity], <RIGHT-CLICK> on a
displayed comment and select “View comments of this type”.
OR
<DOUBLE-CLICK> on any displayed comment
to display only comments of that type.
The
system will display only the comments of the type selected, in chronological
order, with the most recent comment of that type first.
(3) View a selected comment group
only:
It is
possible to have comment type "groups", that is, two or more comment
types that share the same first character.
For instance, Workers’ Comp/1st Notification (“W1”), Workers’ Comp/2nd
Follow-up (“W2”) and Workers’ Comp/Final Results (“WF”).
You can
view a specific "group" of comments by ignoring the second character
when you want to view them.
To view
only a specific group of comments, key the first character of the comment group
followed by a “?” at the top of the screen and click [Only].
The
system will display only the comments from the group keyed, in chronological
order, with the most recent comment of those types first.
(4) Omit a selected comment type:
After you
have clicked on [Activity],
to omit viewing a specific type of comment, key the two‑character comment
type at the top of the screen and click [Omit].
OR
After
you have clicked on [Activity], <RIGHT-CLICK> on a
displayed comment and select “Omit comments of this type”.
The
system will display all comments except the type keyed or selected and the
“changes to file” comments, in chronological order, with the most recent
comment first.
(5) Omit a selected comment type
group:
You can
omit viewing a specific "group" of comments by ignoring the second
character when you want to exclude them.
After
you have clicked on [Activity], to omit a specific group of
comments, key the first character of the comment group followed by a “?” at the
top of the screen and click [Omit].
The
system will display all comments, omitting the group type keyed and the
“changes to file” comments, in chronological order, with the most recent
comment first.
(6) View “changes to file” comments
only:
After
you have clicked on [Activity], to view only the “changes to file”
comments, key “#*” the top of the screen and click [Only].
The
system will display only the “changes to file” comments, in chronological
order, with the most recent “changes to file” comment first.
HOW TO ADD JOB ACTIVITY COMMENTS
You may
enter Job Activity Comments of from one to fifteen lines, unformatted. Or you may enter from one to fifteen lines,
pre-formatted, so everyone in your organization enters a certain type of
comment in the same manner.
How to add a job comment that is 1-15 lines long, optionally
pre-formatted:
To add
job comments, you must first select the job assignment you wish to work
with. While viewing the Job Assignment
Summary screen, you may:
<DOUBLE-CLICK> on the
desired line of job assignment history and then click [Add comments].
OR
<RIGHT-CLICK> on any
summary line and select “Add activity comment”.
The screen will display:
(Click “Options” or <RIGHT-CLICK> on the screen to see options and shortcut keys)
Key a job comment type and press the <TAB> key to advance to
the job comment area.
OR
Select a job comment type by clicking the ![]() button (prompt and select button) to the
right of the job comment type.
button (prompt and select button) to the
right of the job comment type.
The screen will display:
When you see the job comment type you want to use, <DOUBLE-CLICK> on the comment type
and it will be selected and keyed for you.
If you do not see the job comment type you want, click [More]
to view more available job comment types.
When you get to the end, [More] will start the job comment types over
again. To not select a job comment
type, click [Return]
to return to the Add Job Comment screen.
After you have keyed or selected the job comment type,
press the <TAB>
key to advance to the job comment area.
OR
To
select a comment type with a pre-formatted comment area (so that everyone in
your organization enters a certain type of comment in the same manner), click [Mask].
The screen will display:
When you see the mask type you want to use <DOUBLE-CLICK> on the mask type and
you will be returned to the job comment area with your cursor positioned for
keying your job comment on the formatted screen. If you do not see the mask type you want, click [More]
to view more available mask types. When
you get to the end, [More] will start the mask types over
again. To not select a mask type, click
[Return]
to return to the Add Job Comment screen.
Key up to 15 lines of comment.
If you decide not to make a job comment, click [Cancel]
to return to the front screen of the personnel file.
When the job comment is complete, press the <TAB>
key or use your mouse to position to the bottom area of the Job Activity
Comment screen.
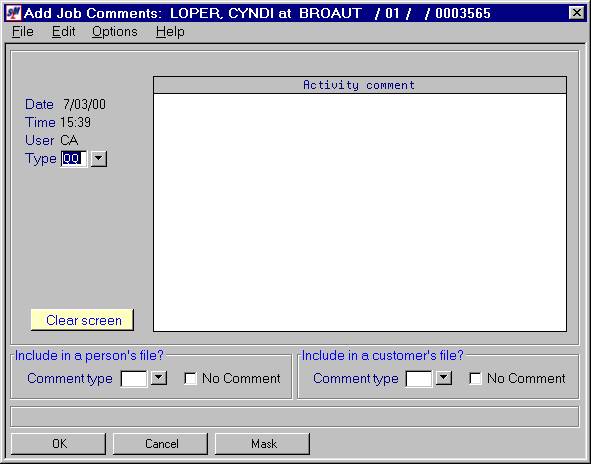
If you want to add this same job comment to a person’s
file, key the appropriate comment type for the person’s file or click the ![]() button (prompt and select button) to the
right of the comment type area to select a person’s comment type. When you see the comment type you want, <DOUBLE-CLICK>
on it to have the system key the comment type for you. If you do not want to add this comment to a
person’s file, select “No Comment” instead of a comment type.
button (prompt and select button) to the
right of the comment type area to select a person’s comment type. When you see the comment type you want, <DOUBLE-CLICK>
on it to have the system key the comment type for you. If you do not want to add this comment to a
person’s file, select “No Comment” instead of a comment type.
If you want to add this same job comment to a customer’s
file, key the appropriate comment type for the customer’s file or click the ![]() button (prompt and select button) to the right
of the comment type area to select a customer’s comment type. When you see the comment type you want, <DOUBLE-CLICK>
on it to have the system key the comment type for you. If you do not want to add this comment to a
customer’s file, select “No Comment” instead of a comment type.
button (prompt and select button) to the right
of the comment type area to select a customer’s comment type. When you see the comment type you want, <DOUBLE-CLICK>
on it to have the system key the comment type for you. If you do not want to add this comment to a
customer’s file, select “No Comment” instead of a comment type.
The comment types for the job, the person and the customer
can all be the same or different.
When the
job comment is complete, click [OK] to return to the job detail screen.
WORKING WITH THE JOB ASSIGNMENT
GENERAL COMMENTS SCREEN
Viewing the job assignment general comment screen
To view
job assignment general comments, you must first select the job assignment you
wish to work with. While viewing the
Job Assignment Summary screen, you may:
<DOUBLE-CLICK> on the
desired line of job assignment history and then click [General comments].
OR
<RIGHT-CLICK> on any
summary line and select “General comments”.
The
screen will display:
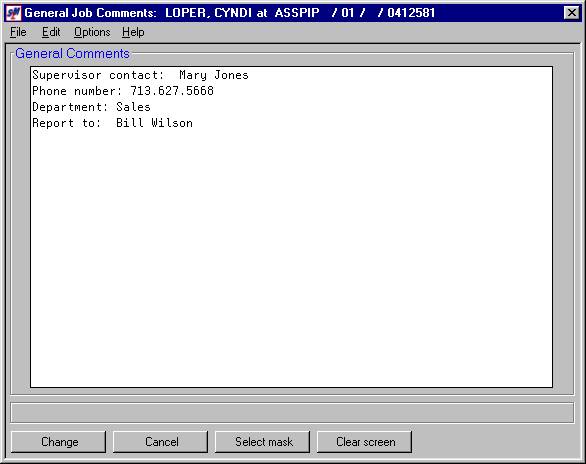
(Click “Options” or <RIGHT-CLICK> on the screen to see options and shortcut keys)
Changing the job assignment general
comment screen
Use the <TAB> key or arrow keys to move your
cursor to the line or area which requires a change. Make any necessary changes and click [Change] to accept the changes and
return to the job assignment detail screen.
If you inadvertently delete something on the screen and can’t remember
what was deleted, click [Cancel] instead
of [Change] and the deletion will not take
effect.
If you
make changes and click [Change], the
screen will display:
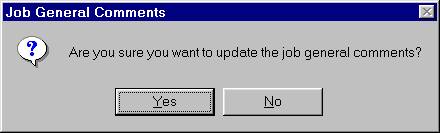
To
update the Job General Comments, click [Yes].
To not update, click [No].
Adding a mask to a job assignment
general comments screen
To add a
formatted mask to the screen, the screen must first be blank. If it is necessary to clear the screen,
click [Clear screen]. To select a mask, click [Mask].
If the
screen is not blank, the screen will display:
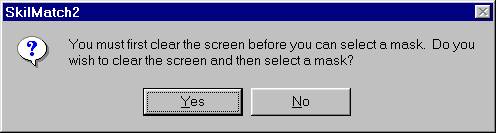
To clear the screen and select a mask, click [Yes].
To leave the screen as it is and not select a mask, click [No].
If the screen is blank, the screen will display:
When you see the mask type you want to use <DOUBLE-CLICK> on the mask type and
you will be returned to the Job General Comment area with your cursor
positioned for keying your Job General Comment on the formatted screen. If you do not see the mask type you want,
click [More]
to view more available mask types. When
you get to the end, [More] will start the mask types over
again. To not select a mask type, click
[Return]
to return to the Job General Comment screen.
Complete
your Job General Comment. When you are
finished, click [Change] to
accept the changes and return to the job assignment detail screen. If you inadvertently delete something on the
screen and can’t remember what was deleted, click [Cancel] instead of [Change] and the deletion will not take
effect.
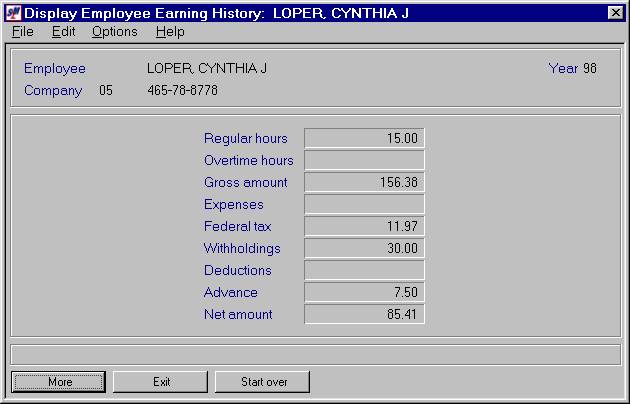
To view
an employee's pay history, click [Checks].
The
screen will display:
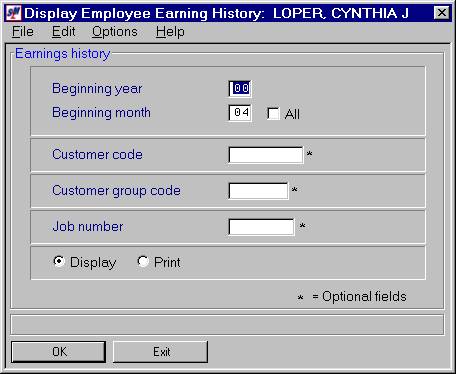
(Click “Options” or <RIGHT-CLICK> on the screen to see options and shortcut keys)
Click [Exit]
to return to the personnel file front screen.
Beginning
year will default to the current year.
To display/print pay detail beginning with a specific year other than
the current one, key the appropriate year.
If you wish to begin with the employee's earliest pay history, check
All. The system will present the
history by year, beginning with the year requested, moving forward to the most
recent pay detail.
Press
the <TAB>
key for additional keying or click [OK] to search.
Beginning
month will default to the current month.
To display/print pay detail beginning with a specific month other than
the current one, key the appropriate month.
If you wish to begin at the first month of the year, key 01.
Note: blanking out this field will also begin the
pay detail beginning with the first month of the year requested except when the
selected beginning year is 00 – using year 00/month 00 will present the
employee’s pay history beginning with the earliest pay; using year 00/month 01
will present the employee’s pay history beginning with January, 2000).
The
system will present the history by year beginning with the year and month
requested, moving forward to the most recent pay detail.
Press
the <TAB>
key for additional keying or click [OK] to search.
If you
wish to view only checks earned at a specific customer, key in the customer
code. If you wish to see all checks,
leave blank.
OR
If you
wish to see only checks earned at a specific group of customers (customers who
belong to a group have customer codes with the first 6 characters identical,
such as KEYBAN01 and KEYBAN02), key in the customer group code. If you wish to see all checks, leave blank.
OR
If you
wish to see only checks earned on a specific job, key the job number. If you wish to see all checks, leave
blank.
The system
will default to Display. If you wish to
print, click Print (a black dot will appear next to your selection).
Note: The printed version shows more detail than
the display version. If you need to
view state/local tax as separate amounts or wish to view deduction detail,
print the pay detail.
To
display/print the pay detail, click [OK].
To not display or print the pay
detail, click [Exit].
If you
chose to display, the screen will display:
(Click “Options” or <RIGHT-CLICK> on the screen to see options and shortcut keys)
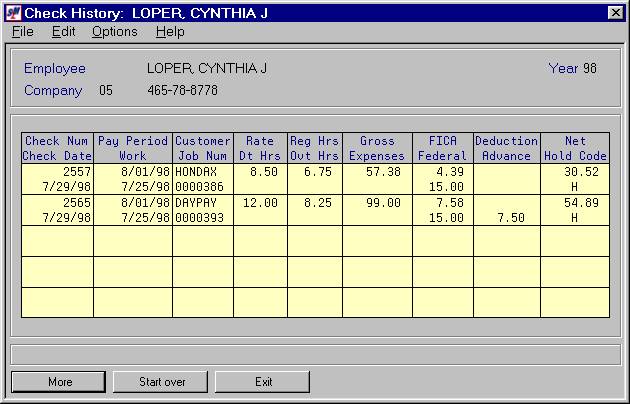
The
check-by-check history will display beginning with the year/month requested (or
the employee’s first pay following the requested dates). To continue viewing, click [More]. When the check-by-check history reaches the end of the year, the
screen will display the totals for the year:
(Click “Options” or <RIGHT-CLICK> on the screen to see options and shortcut keys)
To
continue viewing, click [More]. If the employee had earnings in a subsequent
year, you will see the check-by-check detail for that year followed by the
totals for that year. The very last
screen will display totals for all years combined.
The
screen will display:
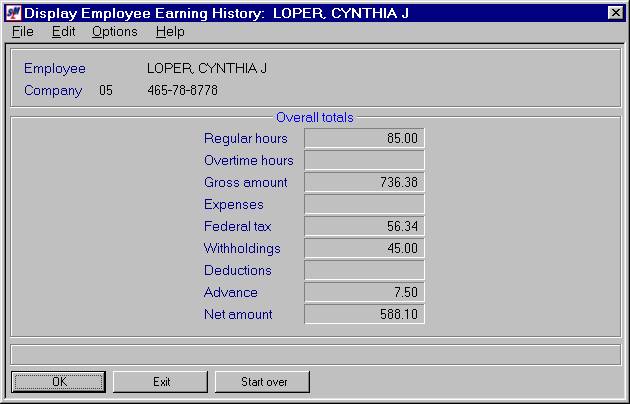
(Click “Options” or <RIGHT-CLICK> on the screen to see options and shortcut keys)
If, at
any time, you wish to discontinue viewing the person’s pay detail, click [Exit] to return to the front screen
of the personnel file. Or if you wish
to restart the job detail request, click [Start over] to
return to the setup screen for the employee’s pay history.
HOW TO VIEW BONUS ELIGIBILITY:
To view
eligibility for each of your bonus programs, click [Bonuses].
The
screen will display:
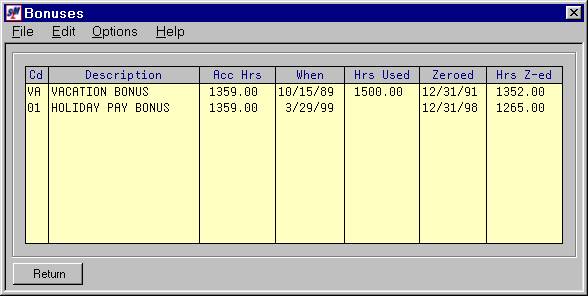
(Click “Options” or <RIGHT-CLICK> on the screen to see options and shortcut keys)
This
screen is updated through the payroll process and will always display the
current figures from the last payroll processed.
When you
are finished viewing this screen, click [Return] to return to the front screen of the
personnel file.
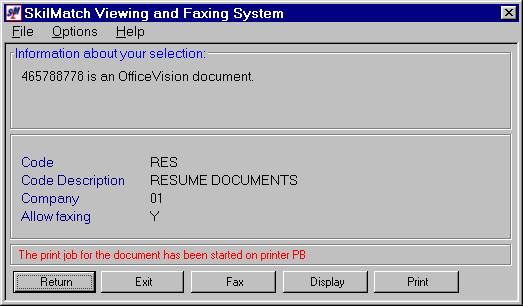
HOW TO VIEW RESUME IMAGES OR DOCUMENTS
Note: your organization must have purchased the
optional customized KeyesFax software for this option to be used.
Note:
*Images
and Documents may be viewed. To view an
image, you must select this option from a PC, a graphics display workstation
(3489 CRT), or a network station. Any
workstation, however, can view a document.
*Images
and Documents may be faxed.
*Images
and Documents may be printed.
*Documents
only may be “searched.” (Images are
stored as a picture; characters are NOT recognized and therefore, text
searching is not possible. Documents
are stored as recognizable characters and therefore, text searching is
possible.) For further information on
text searching, refer to document Menu
SEARCH, Item Skill Search.
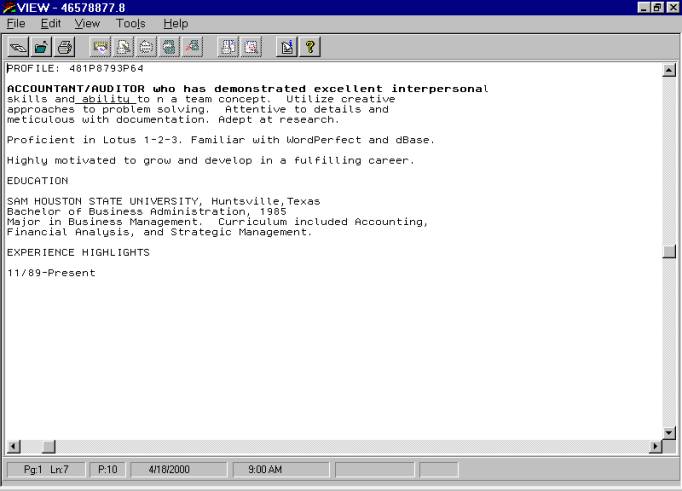
To view
an image, you must select this option from a PC, graphics display workstation
(3489 CRT), or a network station. Click
[Resume
image].
The
screen will display:
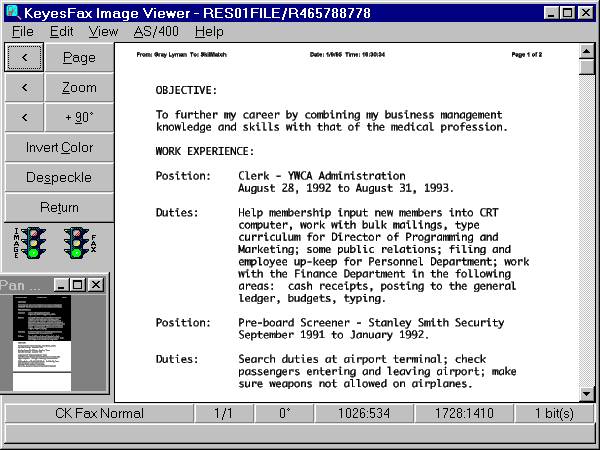
To print
or fax this image, click “File” and then click “Print” or “Send Fax”. To exit the image view and return to the
person’s front screen, click [Return].
May be
done from any workstation. Click [Resume text].
The
screen will display:
If you
are viewing this document on a 3489 workstation, press (ALT/Keypad 2) or
(ALT/Keypad 8) to move the document up and down on your screen. From a PC, use the scroll bar to move the
document up and down on your screen.
To print
this document, click ![]() or click
“File” and then click “Print”. To exit
the document view and return to the person’s front screen, click
or click
“File” and then click “Print”. To exit
the document view and return to the person’s front screen, click ![]() or click
“File” and then click “Cancel”. To fax
this document, exit this view and refer to documentation below for Attachments.
or click
“File” and then click “Cancel”. To fax
this document, exit this view and refer to documentation below for Attachments.
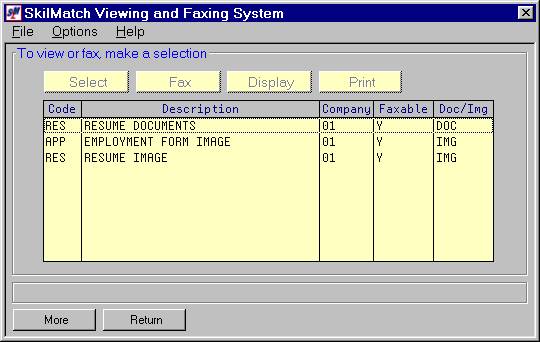
Viewing, Faxing, Printing Other
Documents or Images
If you
wish to view, fax or print other documents or images attached to a person’s
file (this includes all types),
or if the image or document type is not RES, click [Attachments].
If this
person does not have any
documents or images attached, you will get a message in the lower right corner
of the screen - "Documents and images are not
available”.
If this
person's file has any images or documents attached, the system will display a
list of these items.
The
screen will display:
To
cancel this request and return to the front screen of the person’s file, click [Return].
If there
are more than 9 images/documents in this person’s file, click [More]
to display.
To fax,
view, or print one of the items displayed:
Highlight
the desired item and click the appropriate action [Fax], [Display], or [Print].
OR
<RIGHT-CLICK> on any
summary line and select the appropriate action “Fax”, “Display” or “Print”.
Note:
images may be viewed from a PC, a graphics display workstation (3489 CRT), or a
network station. Documents may be
viewed from any workstation.
OR
To see
information about the item, click [Select].
OR
<DOUBLE-CLICK> on any
desired summary line.
The
screen will display:

(Click “Options” or <RIGHT-CLICK> on the screen to see options and shortcut keys)
Viewing Other Documents or Images:
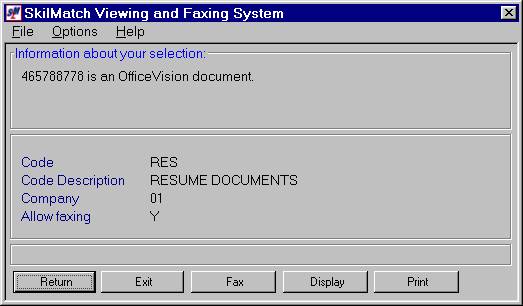
Click [Display]
to view an item. Refer to documentation
above for Viewing a Resume Image or Viewing a Resume Document for viewing
options.
Faxing Other Documents or Images:
If you
selected [Fax],
the screen will display:
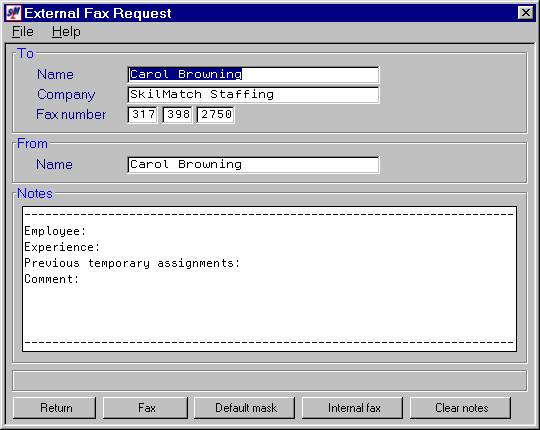
The
system displays the last EXTERNAL FAX REQUEST FORM you used. Change the detail on this screen to reflect
accurate data for this fax.
To
cancel this request and return to the front screen of the person’s file, click [Return].
Option:
You may select a pre-formatted outline for the “notes” area. The notes area must be completely blank to
use this function. To clear the notes
area and select a pre-formatted outline, click [Clear notes] and then click [Default mask].
OR
Click [Default mask]
and if the notes area is not completely blank, the following screen will
appear:
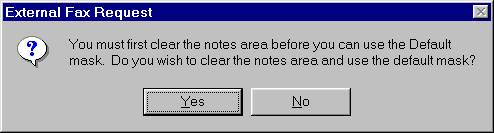
To clear
the notes area and use the default mask, click [Yes]. To leave the notes area as it is and not use the default mask,
click [No].
Once you
have the EXTERNAL FAX REQUEST FORM as you want it and are ready to fax, click [Fax].
The
screen will display:

(Click “Options” or <RIGHT-CLICK> on the screen to see options and shortcut keys)
The
message in the lower left will indicate “The item is being
processed and faxed”. You will also
receive a break message later confirming that a fax was or was not successfully transmitted.
To fax a
copy of this item to your internal fax machine, click [Internal fax].
The
screen will display:
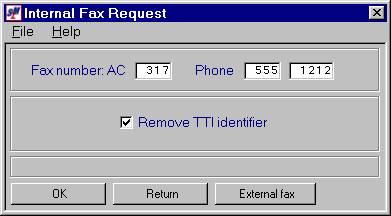
The TTI
identifier will be removed unless you indicate otherwise. (The fax will be presented more like a
"printed" document than like a faxed document with the TTI identifier
removed.) If, however, you prefer to
not remove the TTI identifier, click once to remove the checkmark.
To NOT
continue with faxing, but to return to the options for this image/document,
click [Return].
If you
prefer to fax to an external fax instead of your internal fax, click [External fax].
To
continue faxing to your internal fax, click [OK].
The
screen will display:
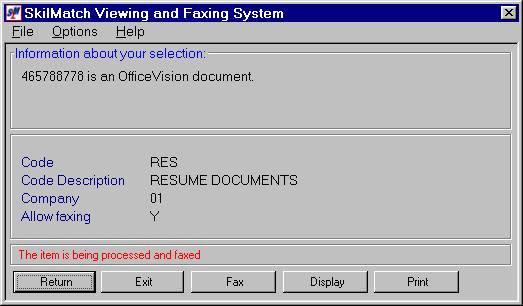
(Click “Options” or <RIGHT-CLICK> on the screen to see options and shortcut keys)
The
message in the lower left will indicate “The item is being
processed and faxed”. You will
also receive a break message later confirming that a fax was or was not successfully transmitted.
If you
send a fax, the system will add an activity comment to the person’s file with a
comment type of #X. The comment will
include the date, time, User ID, the type of image or document that was faxed,
the phone number faxed to, the company name and individual's name faxed to, and
the "from" name.
To
return to the list of images/documents, click [Return] or to return to the
front screen of the person’s file, click [Exit].
Printing Other Documents or Images:
You must
be attached to an HP Laserjet printer (or compatible) in order to select this
option. If you try to send it to any other type of
printer you will get unpredictable
results! Click [Print].
The
screen will display:
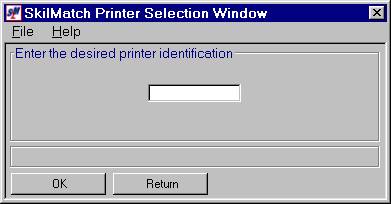
To not
print and return to the list of document/images, click [Return].
The
screen will display:
(Click “Options” or <RIGHT-CLICK> on the screen to see options and shortcut keys)
To
return to the list of documents, click [Return].
To return to the front screen of the person’s file, click [Exit].
To
print, key the desired printer identification and click [OK].
The
screen will display:
(Click “Options” or <RIGHT-CLICK> on the screen to see options and shortcut keys)
You will
receive a message confirming your selection to print. The item will go directly to the printer - bypassing your outq!
HOW TO UPDATE A PERSONNEL FILE
From the
front screen of the personnel file, click [Change].
The
screen will display:
(Click “Options” or <RIGHT-CLICK> on the screen to see options and shortcut keys)
(The
system keeps track of all permanent data entry changes in a personnel
file: Every time the file is changed
through data entry, a comment is written to the person’s Activity Comment
screen. It is dated and timed, shows
the user making the change, and shows what the information was before and after
the change. These comments are
designated as “Changes to file” comments and have a comment type of “#*”).
You will
go directly to the first screen of the personnel file in “data entry
mode”. Make desired changes. If the data you need to change is not on the
front screen or you need to make changes on additional screens, click [Continue] to move to the desired
screen. To go back to a previous
screen, click [Back]. When all changes have been keyed, click [Finish]. If you decide not to make changes, click [Cancel].
For
detailed documentation to make changes to the personnel file, refer to document
Menu
CHANGE, Item Employee or document Menu
CHANGE, Item Applicant.
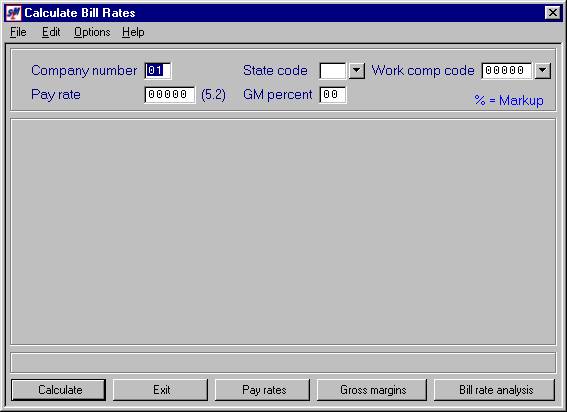
RATE CALCULATION AND ANALYSIS:
To
calculate a pay or bill rate, calculate gross margins, or analyze pay and bill
rate structures, click [Rates].
The
screen will display:
(Click “Options” or <RIGHT-CLICK> on the screen to see options and shortcut keys)
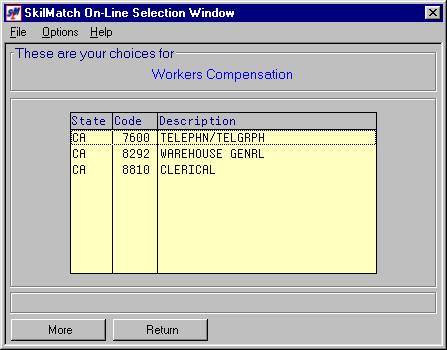
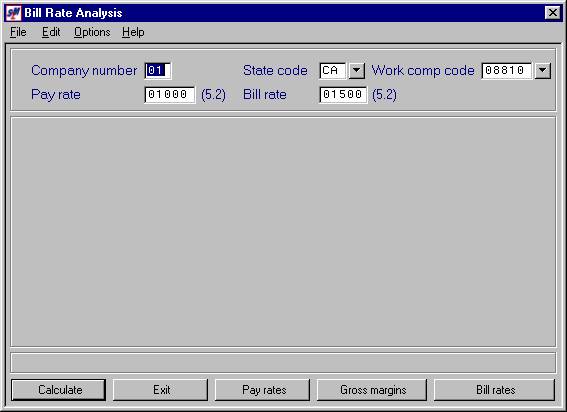
How to calculate a bill rate
To
calculate a bill rate, complete this screen and click [Calculate]. You may click the ![]() button (select and prompt button) to select a
Workers’ Compensation code.
button (select and prompt button) to select a
Workers’ Compensation code.
The
screen will display:
(Click “Options” or <RIGHT-CLICK> on the screen to see options and shortcut keys)
When you
see the Workers’ Compensation code you want, <DOUBLE-CLICK>
on the line and the system will key the information for you.
(If your
company has established a minimum pay rate, you will not be allowed to do a
rate calculation on a pay rate less than the company minimum.)
When the
screen is complete, click [Calculate].
The
screen will display:
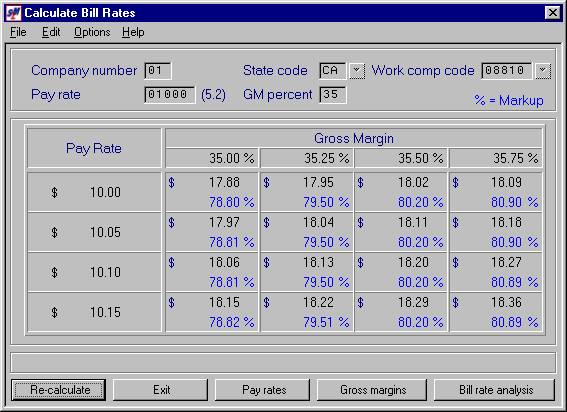
(Click “Options” or <RIGHT-CLICK> on the screen to see options and shortcut keys)
The
system will provide you with a range of Bill rates that reflect incremental
increases in Pay rate and gross margins.
To calculate another Bill rate based on another combination of Pay
rates, gross margins and Workers’ Comp rates, click [Re-calculate]. When you are finished calculating Bill
rates, click [Exit]
to return to the person’s personnel file front screen.
How to calculate a pay rate
While
you are in the rate calculation function, click [Pay rates].
The
screen will display:

(Click “Options” or <RIGHT-CLICK> on the screen to see options and shortcut keys)
To
calculate a Pay rate, complete this screen and click [Calculate]. You may click the ![]() button (prompt and select button) to select a
Workers’ Compensation code, as above.
button (prompt and select button) to select a
Workers’ Compensation code, as above.
The
screen will display:
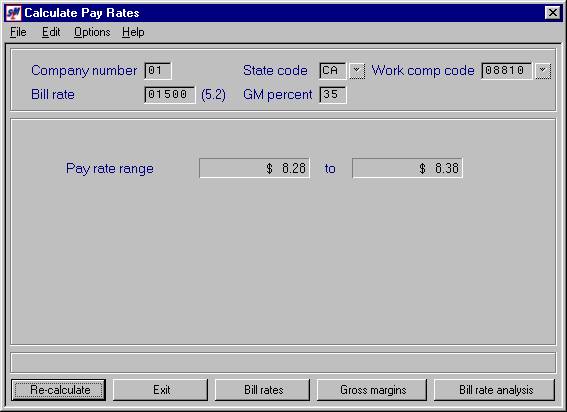
(Click “Options” or <RIGHT-CLICK> on the screen to see options and shortcut keys)
The
system will provide you with a range of Pay rates that reflect the Bill rate
and gross margin requirements. If your
bill rate is too low to keep the pay rates above the minimum set for your
company, you will get a warning message.
To calculate another Pay rate based on another combination of Bill
rates, gross margins and Workers’ Comp rates, click [Re-calculate]. When you are finished calculating Pay rates,
click [Exit]
to return to the person’s personnel file front screen.
How to calculate a gross margin
While
you are in the rate calculation function, click [Gross margins].
The
screen will display:
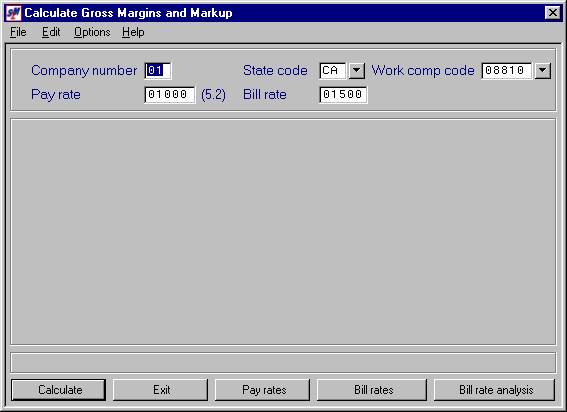
(Click “Options” or <RIGHT-CLICK> on the screen to see options and shortcut keys)
To
calculate gross margin and mark-up, complete this screen and click [Calculate]. You may click the ![]() button (prompt and select button) to select a
Workers’ Compensation code, as above.
button (prompt and select button) to select a
Workers’ Compensation code, as above.
Note: if your company has established a minimum
Pay rate, you will not be allowed to do a gross margin calculation on a Pay
rate less than the company minimum.
The screen
will display:
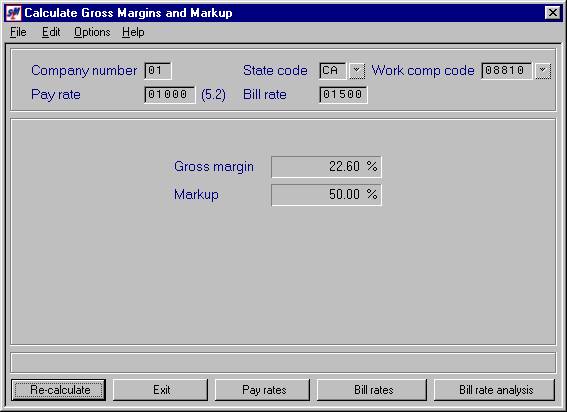
(Click “Options” or <RIGHT-CLICK> on the screen to see options and shortcut keys)
The
system will provide you with a gross margin and mark-up analysis that reflects
the Pay and Bill rates keyed. To
calculate another gross margin rate based on another combination of Pay and
Bill rates and Workers’ Comp rates, click [Re-calculate]. When you are finished calculating gross margins, click [Exit]
to return to the person’s personnel file front screen.
How to view a detailed rate analysis
While
you are in the rate calculation function, click [Bill rate analysis].
The
screen will display:
(Click “Options” or <RIGHT-CLICK> on the screen to see options and shortcut keys)
To view
a detailed rate analysis, complete this screen and click [Calculate]. You may click the ![]() button to select a Workers’ Compensation
code, as above.
button to select a Workers’ Compensation
code, as above.
(If your
company has established a minimum Pay rate, you will not be allowed to do a
gross margin calculation on a Pay rate less than the company minimum.)
The screen
will display:
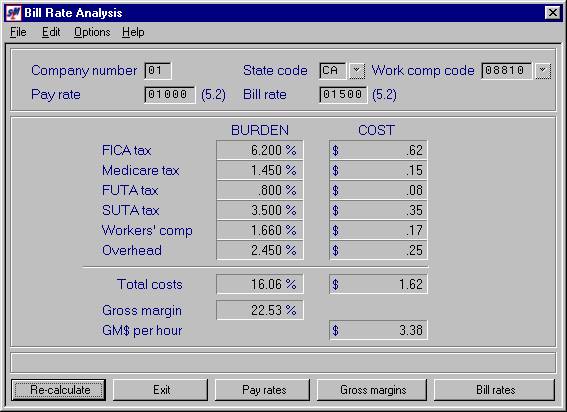
(Click “Options” or <RIGHT-CLICK> on the screen to see options and shortcut keys)
The
system will provide you with detailed Bill rate analysis that reflects the Pay
and Bill rates keyed. To view another
rate analysis based on another combination of Pay and Bill rates and Workers’
Comp rates, click [Re-calculate].
When you are finished calculating gross margins, click [Exit]
to return to the person’s personnel file front screen.
HOW TO VIEW AND WRITE TO A BLACKBOARD:
A
blackboard is a blank screen that can be used as a notepad. Multiple blackboards may be set up on your
system – one for each user, one for each branch office, etc.
Click
“Options” or <RIGHT-CLICK> on
the personnel file front screen. Select
“Blackboard”.
The
screen will display:

Key a
valid set of initials and press [OK].
(To create blackboards, please refer to document Menu
GENRPT, Item Blackboard Records).
The
screen will display:

Key up
to 17 lines of comment or edit existing comments. When you have finished adding or editing comments, click [OK]. Or if you
decide you do not want to update the blackboard with the changes you have
keyed, click [Cancel]; the
blackboard will remain unchanged. You
will be returned to the “Personal Blackboard Reminder” screen. You may return to the same blackboard by
rekeying the original initials or you may go to a different blackboard by
keying another valid set of initials.
If you are finished, click [Exit] to
return to the front screen of the personnel file.
HOW TO ACCESS THE CUSTOMER SEARCH FUNCTION:
You may
go directly to the Customer Search Function from a person’s file. In the lower right corner of the screen,
click ![]() .
.
The
screen will display:
(Click “Options” or <RIGHT-CLICK> on the screen to see options and shortcut keys)
For
detailed documentation on the Customer Search Functions, refer to document Menu
SEARCH, Item Customer Search.
HOW TO ACCESS THE SKILL SEARCH FUNCTION:
You may
go directly to the Skill Search Function from a person’s file. In the lower right corner of the screen,
click ![]() .
.
The
screen will display:
(Click “Options” or <RIGHT-CLICK> on the screen to see options and shortcut keys)
For
detailed documentation on the Skill Search Functions, refer to document Menu
SEARCH, Item Skill Search.