MERGE SOCIAL SECURITY NUMBERS
You may find that an employee has been entered into the system with an incorrect social security number, or that the employee has two or more files in SkilMatch. In either case, you cannot simply go into the employee’s file and change the social to a different number. Instead, you must set up the employee to be processed as a part of a Social Security Merge. During the merge process all the records associated with a person’s existing social security number will be transferred over to a different number, or in the case of having more than one social security number, will be merged together into a single employee file.
This option processes the actual merge of the incorrect/replacement social security numbers (SS#) previously entered through the menu item Enter Social Security Numbers (step one of the process).
Depending on the size of your data files, and the speed of your server, the merge procedures could take from 5 minutes to 5 hours. The system will add a CHANGE comment (#* type) to each applicant who had a "merge" processed during this procedure.
This option DOES NOT merge PC documents attached to the employee file. Documents accessed through Name Search, [Word résumé], [Résumé folder] or [Employee folder] must be manually renamed BEFORE the merge is processed.
Click PC Documents for further assistance.
If you use a timesheet "interface" to
provide time information to the SkilMatch payroll system (including, but not
limited to, Kronos and Ti3) - When, through the Social Security Merge
option, you remove or change a social security number that is already "in
process" (i.e., previously submitted or entered) with an external
"interface", it is likely the timesheet batch that is created from
the external "interface" will contain a timesheet with an invalid
social security number. When you edit
the timesheet batch, you will be notified of this error on the edit report. Delete the timesheet with the invalid social
security number and re-enter all of the data under the correct social security
number.
All users must be signed off of SkilMatch during the processing of the merge option. Schedule your processing accordingly.
Social Security Numbers that are merged
CANNOT be “unmerged”!
PRELIMINARY PROCEDURES:
The system will go through it’s own internal checklist before it begins the merge process. It will HALT itself for a variety of reasons. To avoid having the system HALT the process, you should make certain you have completed the following steps:
Web-based (SME) users preliminary
procedures:
(1) _______ Be 100% certain that the Social Security numbers involved in this process are completely accurate. If you process this option and merge unrelated files together, you will have a bigger problem than you started with! Review report created in List Social Security Numbers option.
(2) _______ Merge PC documents attached to the employee file. Documents accessed through Name Search, [Word résumé], [Résumé folder], or [Employee folder] must be manually renamed BEFORE the merge is processed.
Click PC Documents for further
assistance. Be sure to rename the
folders for: Word Resumes, Resume folder, and Employee folder.
(3) _______ Make certain that the company is between payrolls (completely finished with the last payroll).
(4) _______ Verify that there are NO existing timesheet batches showing for any general ledger company where the SS merge is being processed. Go to Menu Timesheet Processing, Item Timesheets (for medical payrolls, go to this option in your Medical library; for Staff payrolls, go to this option in your Staff library). If any batches exist, they MUST be deleted before continuing.
(5) _______ If you process cumulative billing, make sure the cumulative invoices have been printed, posted, and saved.
(6) _______ Process a "Begin Cycle" for each company where a SS merge is being processed (Menu Timesheet Processing, Item Begin Cycle) in TEMP payroll (if employee is in Staff payroll, process this step in the Staff library). This will remove the current "merged" timesheet file for each company. Select to clear the cumulative billing file for each company.
NOTE: Refer to Menu File Maintenance, Item Payroll System Requirements if you need the password for the begin cycle.
NOTE: A begin cycle for Staff payroll will create the reoccurring Batch 01, this must be deleted after the begin cycle has run.
(7) _______ Make a NOTE of each process “turned off” so that you will remember to “turn on” when merge is complete. If you are unsure if your system has any of these tasks scheduled, contact SkilMatch.
(8) _______ If you use the SkilMatch calendar system, turn calendar messaging off. On a command line, key CALTASKS. Click “End SCS Messaging”.
Calendar messaging is now turned off.
(9) _______ Make certain that staff members are signed off, check PC’s for signed on sessions. The merge will not start if staff member is signed on.
(10) _______ Turn OFF your nightly “automated” processes by processing the WEBSTOP command to end all Web Interface programs that may be running (may include, but not limited to Web Reports, iWebTime, PSO, ATS). Make a NOTE so that you start again when merge is complete. If you are unsure if your system has any of these tasks scheduled, contact SkilMatch.
SkilMatch customers with their own server
(non-SME):
(1) _______ Be 100% certain that the social security numbers involved in this process are completely accurate. If you process this option and merge unrelated files together, you will have a bigger problem than you started with! Review report created in List Social Security Numbers option.
(2) _______ Check system for scheduled IPL (power down and reboot), key command DSPPOWER to see when you system is scheduled to run an IPL. You can adjust your SS merge accordingly OR contact SkilMatch to temporarily disable the scheduled IPL (user profile must contain the group profile SKIMBLOW or SKIBMHI).
(3) _______ Merge PC documents attached to the employee file. Documents accessed through Name Search, [Word résumé], [Résumé folder], or [Employee folder] must be manually renamed BEFORE the merge is processed.
Click PC Documents for further
assistance. Be sure to rename the
folders for: Word Resumes, Resume folder, and Employee folder.
(4) _______ Make certain that the company is between payrolls (completely finished with the last payroll).
(5) _______ Verify that there are NO existing timesheet batches showing for any general ledger company where the SS merge is being processed. Go to Menu Timesheet Processing, Item Timesheets (for medical payrolls, go to this option in your Medical library; for Staff payrolls, go to this option in your Staff library). If any batches exist, they MUST be deleted before continuing.
(6) _______ If you process cumulative billing, make sure the cumulative invoices have been printed, posted, and saved.
(7) _______ Process a "Begin Cycle" for each company where a SS merge is being processed (Menu Timesheet Processing, Item Begin Cycle) in TEMP payroll (if employee is in Staff payroll, process this step in the Staff library). This will remove the current "merged" timesheet file for each company. Select to clear the cumulative billing file for each company.
NOTE: Refer to Menu File Maintenance, Item Payroll System Requirements if you need the password for the begin cycle.
NOTE: A begin cycle for Staff payroll will create the reoccurring Batch 01, this must be deleted after the begin cycle has run.
(8) _______ Check with your office administrator to make certain that your @Maynard user profile has *ALLOBJ authority. Native users adopt @Maynard authority when this option is run; therefore, @Maynard must have *ALLOBJ authority.
(9) _______ Perform a Daily File Save (Menu Utility, Item Daily Save). Do not use the nightly unattended backup as a substitute. Do not use a full system save as a substitute. The Daily File Save will locate any files that are "hung". These files will prevent Social Security Merge from processing. Have the backup tape sitting with you.
(10) _______ Make certain that no one is signed on, and no jobs are running. Key ACTIVEJOBS on a command line, and press (F14, this is shift+F2) to check for active jobs and disconnected jobs. If any jobs (other than yours) are displayed, they must be ended before you can continue.
(11) _______ Make a NOTE of each process “turned off” so that you will remember to “turn on” when merge is complete. If you are unsure if your system has any of these tasks scheduled, contact SkilMatch.
(12)
_______ If you have reports or queries that
run automatically, you must temporarily disable these processes so they will
not run during the SS merge. The
command WRKSCHED will display the jobs and allow you to make
changes. You can hold and release
scheduled jobs if they will interfere with your merge. Check with the appropriate personnel in your
company regarding possible queries and/or reports.
NOTE: To VIEW scheduled jobs user profile must
contain group profile SKIBMLO or SKIBMHI.
To allow user the authority to MAKE CHANGES to job scheduler, user must
have the additional special authority *JOBCTL in user profile.
NOTE: The scheduled clean-up job that runs every
night will not interfere with the SS merge.
It is not necessary to disable this job.
(13) _______ If your standard daily backup occurs automatically during the night, you must temporarily disable the backup so that it will not process during the SS merge tonight. (Refer to Menu Utility, Item Scheduled Save Set-Up and Menu Scheduled Save Set-Up, Item Off).
(14) _______ Turn OFF your nightly “automated” processes by processing the WEBSTOP command to end all Web Interface programs that may be running (may include, but not limited to Web Reports, iWebTime, PSO, ATS). Make a NOTE so that you start again when merge is complete. If you are unsure if your system has any of these tasks scheduled, contact SkilMatch.
(15) _______ If you use the SkilMatch calendar system, turn calendar messaging off. On a command line, key CALTASKS. Click “End SCS Messaging”, calendar messaging is now turned off.
(16) _______ If you are receiving QSYSOPR messages, sign off and back on before beginning to release the QSYSOPR and no longer receive the system messages. No one can be signed onto the QSYSOPR message queue while merging customer codes.
RENAME EMPLOYEE RESUMES/FOLDERS:
Web-based users (SME)/Local PC File Servers - If you use the Employee folder, Résumé folder,
and Word résumé option(s) in the employee file, use reports generated
during Social Security/Print Report option to manually rename
folders on LOCAL PC server (from the incorrect SS# folder to the replacement
SS# folder) BEFORE merging. Once the merge has taken place you will not
be able to access folders for Social Security numbers that no longer
exist.
SkilMatch PC File Server - If you use the Employee folder, Résumé folder, and Word résumé option(s) in the employee file, the incorrect SS# folders will be automatically updated during the Social Security Merge process. If the program receives an error regarding employee folders, necessary corrections will be listed on report. All corrections MUST be made BEFORE merge can be processed. To discuss the use of the SkilMatch PC File Server, contact SkilMatch.
HOW TO RENAME WORD RESUMES:
NOTE: These steps
need to be completed BEFORE you process the merge.
On your PC, <Right-Click> on [Start], select Explore.
Locate the ‘R’ drive and click on it once to select.
Locate the Word Résumé for the incorrect social security number. Word
Résumé are named
Co#SS#.
Example: the Word resume for SS# 465-78-8778 in
Company #01 would be named 01465788778.
Then <Right-Click> once on the document to highlight
it and then click ‘Rename’ from the menu box. Key the Co# and correct SS#. Make sure the file extension remains ‘.doc’.
HOW TO RENAME EMPLOYEE FOLDERS and RESUME FOLDERS:
NOTE: These steps
need to be completed BEFORE you process the merge.
In SkilMatch, go to Name Search. Go into the
employee file for the incorrect social security number, the
screen will display:
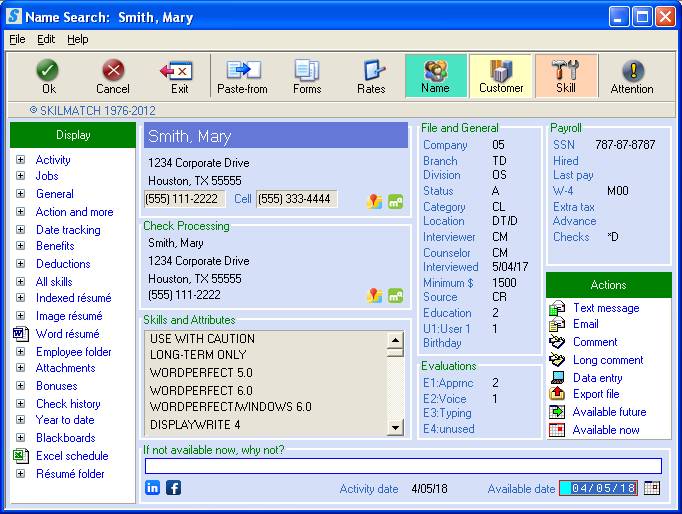
Click [Employee
folder], the screen
will display:
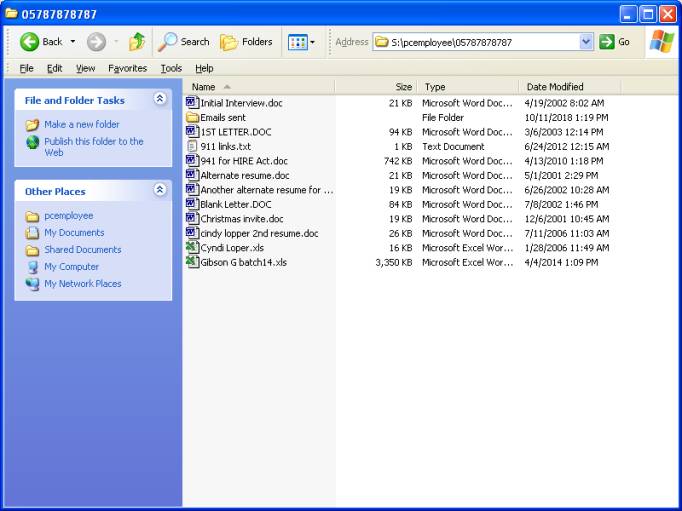
Click the “Up” button (located
directly above the “Address” line). The
screen will display:

Locate the folder for the
incorrect social security number.
Employee folders are named Co#SS#.
Example: the Employee folder for
SS# 787-87-8787 in
Company #01 would be named
05787878787.
Then,
<Right-Click>
once on the folder to highlight it and click ‘Rename’ from the menu box. Key the Co# and correct SS#. There is no file extension for a folder.
Verifying
Rename Results:
After the merge has processed, go
to Name Search.
Go into the personnel file for the correct social security number.
If you renamed a Word resume, click [Word résumé]. The renamed
file should display.
If you renamed an Employee folder, click [Employee folder].
The renamed folder and its contents should display.
If you renamed a Resume folder, click [Résumé folder].
The renamed folder and its contents should display.
If you need further assistance,
contact your SkilMatch representative.
HOW TO PROCESS SOCIAL SECURITY MERGE
If your company owns it’s own server (not Web-based (SME) customers), make certain before you select this option that you are not receiving the system operator “break” messages. If you are signed up for these “break” messages, you should sign off and back on to release yourself from the messages.
The merge will HALT if you are receiving break messages!
Make
sure that ALL preliminary steps have been completed to ensure a success Social
Security merge and prevent system downtime for staff.
SKILMATCH HIGHLY RECOMMENDS that you monitor the
start of the merge process for the FIRST 5 MINUTES until you receive the
message “Social Security Number merge has begun, this will take some time.”, to
ensure the process has started. The
majority of the system-warning message due to errors will occur in the first 5
minutes. For additional warning/error
message information, refer to the documentation below.
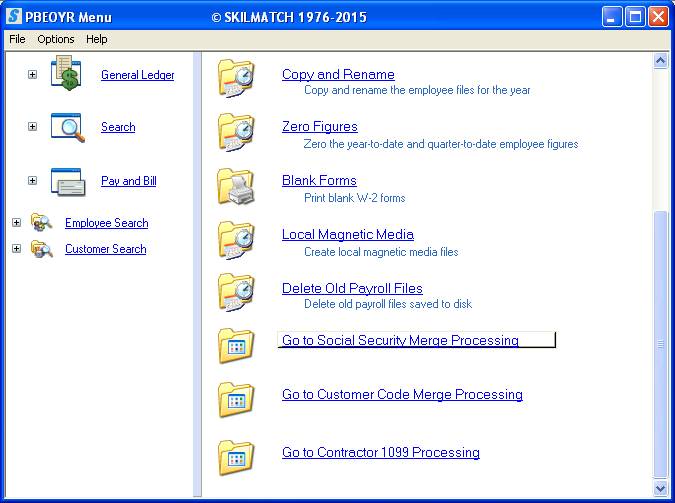
To begin, select the [End-of-Year] menu in the Pay and Bill library.
Scroll down, or right-click in the white section of the screen to view an entire list of menu options.
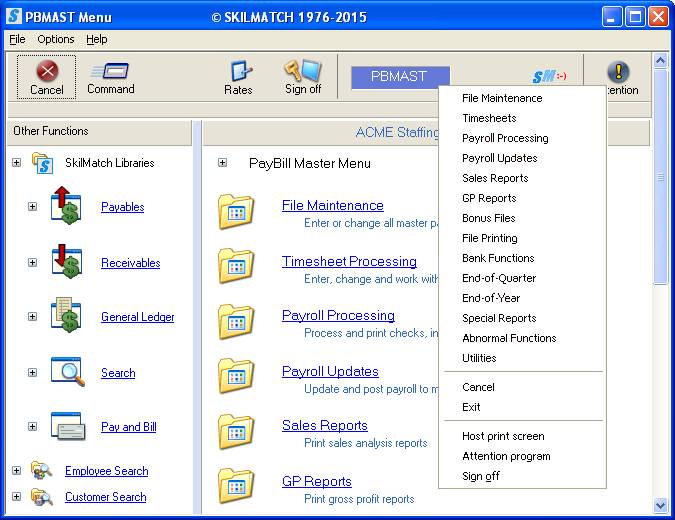
The screen will display:
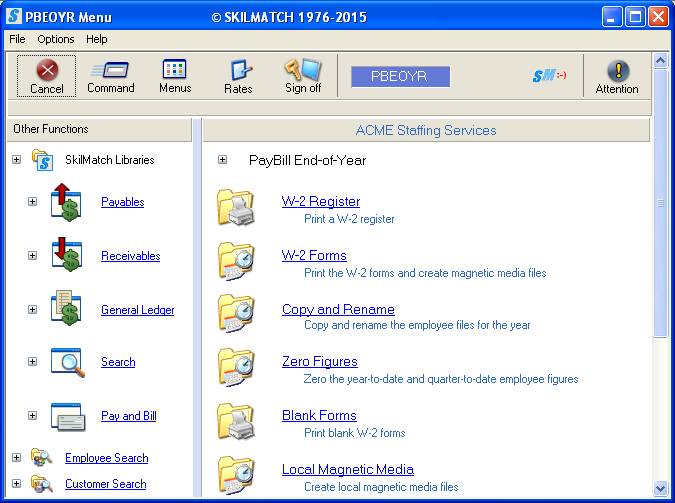
Next, scroll down or right click and select [Go to Social Security Merge Processing].
The screen will display:
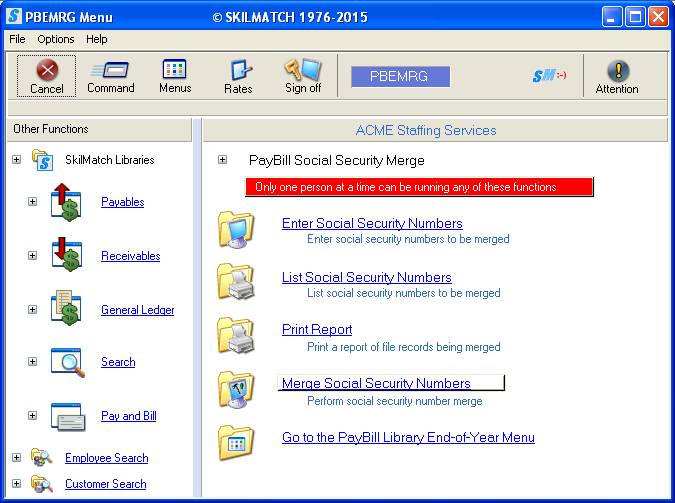
Click [Merge Social Security Numbers], the screen will display:
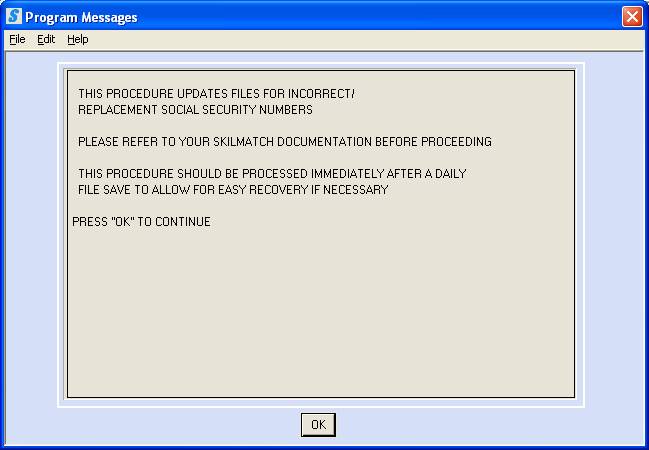
READ the warning on this screen then click [OK], the next screen will display:

Read these
warning messages!
If all users are signed off, no jobs are running
(including disconnected jobs), you are not receiving system operator break
messages and you have completed all of the preliminary steps listed previously,
key YES and press <Enter>.
OR
If you do NOT wish to proceed, or if you still have users signed on, or if there are jobs running, or if you are receiving system operator break messages, or you did not complete the preliminary steps listed above key NO and press <Enter>.
If you key YES to continue, the system will check for existing timesheet batches (both individual and merged) for the companies in which you have entered social security number changes. This internal check may take up to 5 minutes to complete.
If the system finds a batch of timecards, you will receive a message on the screen and the merge WILL NOT CONTINUE. If you get this message, then you either did not do a "Begin Cycle" or you still have existing batches that need to be deleted.
If the system does NOT locate any batches, you will see a message that reads: SOCIAL SECURITY NUMBER MERGE HAS BEGUN, THIS WILL TAKE SOME TIME.
The screen will display each step as the procedure is running. This may take some time. When the procedure has completed, you will be returned to the “PayBill Social Security Merge” menu.
While the actual SS# merge is processing, messages will be sent to the internal system operator about the progress of the merge procedure. These messages will assist in analyzing any errors or abnormal endings of the SS# merge procedures, contact SkilMatch for assistance.
Messages will be sent regarding:
* Start of procedure and workstation ID
* Start of the pre-merge
* Completion of the pre-merge
* Merging of the files
* Merging daily pay files (custom-written program)
* Merging resumes/documents
* Start of the post-merge
* Completion of procedure and workstation ID
After the merge has completed and you have returned to the “PayBill Social Security Merge” menu, please look at the special messages sent to confirm that all steps completed successfully.
To view these messages key DSPMSG SSMERGE on any command line and click [OK].
If the last message reads “SS# MERGE COMPLETED”, then your merge completed successfully.
POST-MERGE PROCEDURES
ALL SkilMatch users (SME and Platinum
Users):
(1) _______ Review the system messages as described above (command DSPMSG SSMERGE) to confirm the merged completed successfully. If the last line does NOT read “SS# MERGE COMPLETED”, call SkilMatch immediately for assistance. Do not let staff sign on to SkilMatch until the system has been reviewed!
(2) _______ Alert the payroll supervisor that a "Begin cycle" was processed for this company in order to process this SS merge, they will need to do an "Abnormal begin cycle" (Menu Abnormal Functions, Item Abnormal Begin) for the next payroll.
(3) _______ Keep the paper printouts associated with this merge in the
designated Social Security Merge file folder.
If you do not have one, please start
one for archival
purposes.
(4) _______ If you stopped with the Web Interface programs with the WEBSTOP command, process the WEBSTART to resume all Web Interface processing (may include, but not limited to Web Reports, iWebTime, PSO, ATS).
Additional step For SkilMatch customers with
their own server (non-SM/E):
(5) _______ If your organization uses the SkilMatch calendar system, turn calendar messaging on. On a command line, key CALTASKS. Click “Start SCS Messaging”. Calendar messaging is now turned on.
(6) _______ If you turned off the nightly automatic backup, then you must use Menu Utility, Item Scheduled Save Set-Up and Menu Scheduled Save Set-Up, Item On to turn it back on.
(7) _______ If
you HELD any scheduled jobs, then you need to RELEASE them to
process as scheduled. The command WRKSCHED
will display the jobs and allow you to make changes. Use the preliminary checklist as a reminder of which jobs to RELEASE.
(8) _______ If you disabled reports or queries that run automatically, re-enable them. These items could be scheduled to the job scheduler or to an OfficeVision calendar. Check with the appropriate personnel in your company.
(9)
_______ Confirm with your “Preliminary”
checklist that all processes “stopped” are started again.