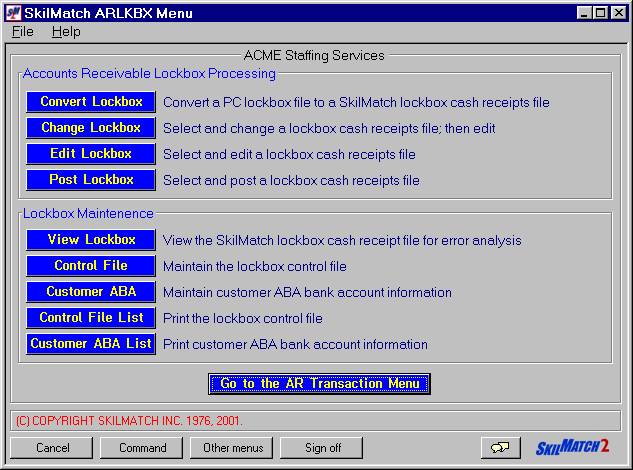
INTRODUCTION TO LOCKBOX PROCESSING
The lockbox processing options allow you to make arrangements to have your customers mail invoice payments to your bank. The bank creates a file of cash receipts data, which is then retrieved from the bank, uploaded into SkilMatch, and processed as any other SkilMatch cash receipt batch.
Because cash receipt files differ bank-to-bank, custom programming is required prior to using the SkilMatch Lockbox Processing options.
The following preliminary steps must be taken prior to using the SkilMatch Lockbox Processing menu options:
(1) Make arrangements with your bank for this service.
(2) Notify SkilMatch of your intent and make arrangements for the custom programming.
(3) Set up lockbox processing options in A/R system file. Refer to document Menu ARMANT, Item System for further assistance.
(4) Set up lockbox control file. Refer to document Menu ARLKBX, Item Control File for further assistance.
Once all preliminary steps have been completed, you may begin using the SkilMatch Lockbox Processing options.
INTRODUCTION TO CONVERTING A PC LOCKBOX FILE TO A SKILMATCH
LOCKBOX CASH RECEIPTS FILE
Note: before processing this option, you should
retrieve the lockbox file from the bank to this PC. How this is accomplished is between you and your bank.
This option:
(1) uploads the lockbox file from your PC to the AS/400.
(2) performs an initial edit on the data; edit report is produced in
your outq. Refer to Reports
for further information concerning this edit.
(3) converts the
uploaded file from the bank-specific lockbox file format to the
SkilMatch-standard lockbox file format.
(4) creates a SkilMatch
cash receipt file, which can be reviewed, edited, posted.
(5) produces an edit which lists the transactions received in the
lockbox (Lockbox Checks, LB010). Refer
to Reports for further information concerning this edit.
(6) for each cash receipts batch that is created, a cash receipts edit
report is produced. This report lists every transaction
received from the bank even if there is a problem with the transaction that
will prevent it from posting. Refer to Reports for further information concerning this edit.
Note: when a lockbox file is retrieved from the
bank, you must process this option (Menu ARLKBX, Item Convert Lockbox) before retrieving another
file from the bank. It is NOT necessary
to process additional Menu ARLKBX options before retrieving another file from
the bank.
HOW TO CONVERT A PC LOCKBOX FILE TO A SKILMATCH LOCKBOX CASH
RECEIPTS FILE
To begin,
on the “Accounts Receivable Master” menu, click [Transactions].
The
screen will display:

Click [Lockbox].
The
screen will display:
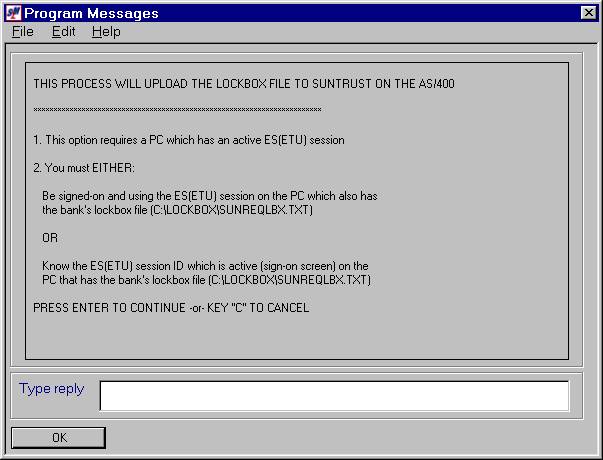
Before continuing, confirm the following:
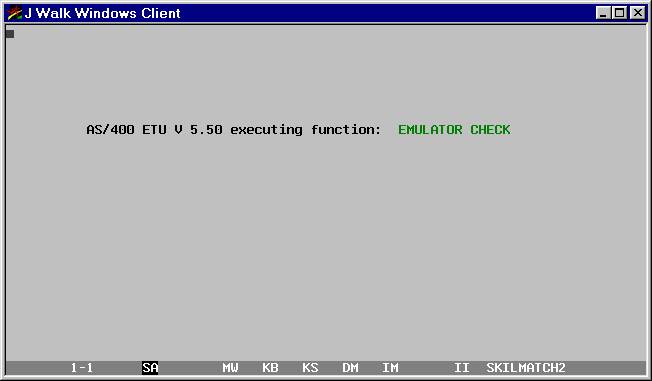
(1) the PC being used for lockbox processing must have an ES session.
(2) the PC must have folder lockbox (C:\lockbox).
(3) the PC must have the bank’s lockbox file (C:\lockbox\filename.txt)
which you previously retrieved.
(4) you should be:
(a) signed on and
using the ES session on the PC (ES session will be ‘green screen’)
OR
(b) have the ES
session open (sign-on screen displayed)
Note: these instructions are written assuming you are signed onto a SM2 session and that you have the ES session open (sign-on screen displayed). If you are signed onto the ES session, your screens will not look like the screens in this documentation; you will see ‘green screens’.
Click [Convert
Lockbox].
If
another user is using lockbox processing, the screen will display:
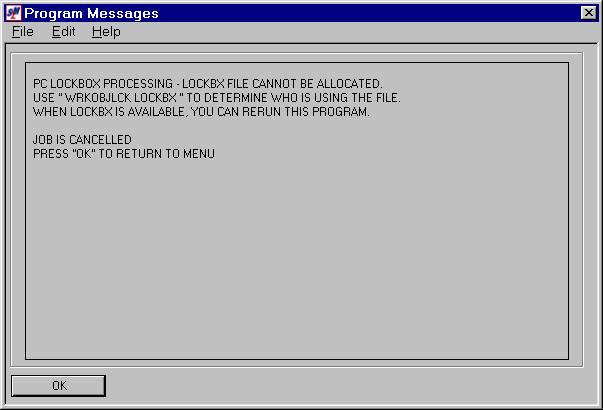
Click [OK]. You will be returned to the “Accounts Receivable Lockbox Processing”
menu. Try again when the lockbox file
is no longer in use.
If the
system detects that an error occurred during your last attempt to process, the
screen will display:
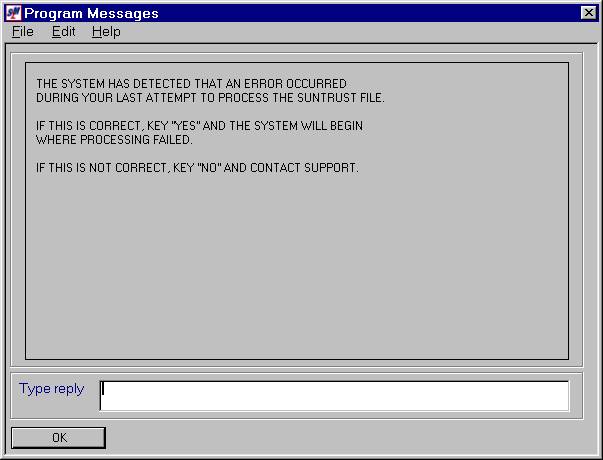
If an
error did occur during your last attempt to process, key YES and processing
will begin where it previously failed.
If
another user is NOT using lockbox processing and an error did NOT occur during
your last attempt to process, the screen will display:
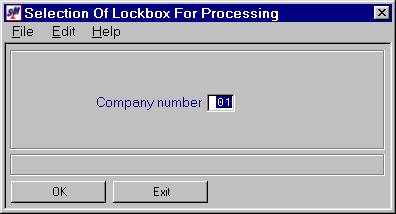
Company Number:
Defaults to company 01. If you wish to select a lockbox for a different company, key the desired company number.
To NOT continue, click [Exit]. You will be returned to the “Accounts
Receivable Lockbox Processing” menu.
To continue, click [OK].
The screen will display:
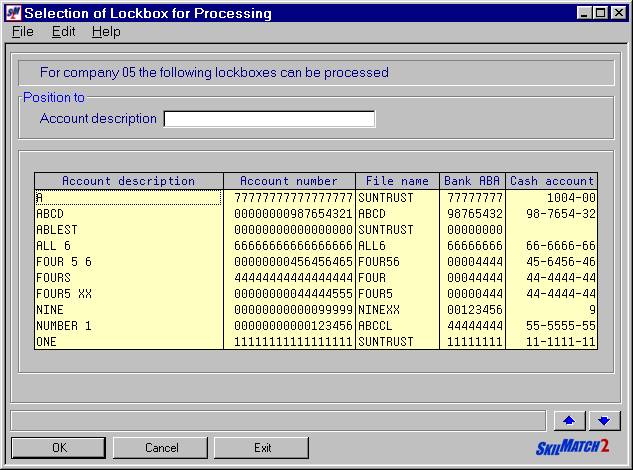
Position To:
If the
desired lockbox does not appear on the first screen, you may <Page
Down> by clicking the ![]() button.
button.
OR
You may enter a portion of the account description in the position to
area and click [OK].
To Select The Desired
Lockbox:
To NOT continue, click [Exit]. You will be returned to the “Accounts
Receivable Lockbox Processing” menu.
To select a lockbox for a different company number, click [Cancel]. You will be returned to the previous screen
where you may key a different company number.
To continue, click once on the desired account to highlight it and
then click [OK].
OR
<DOUBLE CLICK> on the desired account to select.
The
screen will display:
To NOT continue, key C and click [OK]. You will
be returned to the “Accounts Receivable Lockbox Processing” menu.
To continue, click [OK].
If an uploaded PC file already exists on the AS/400, the screen will
display:
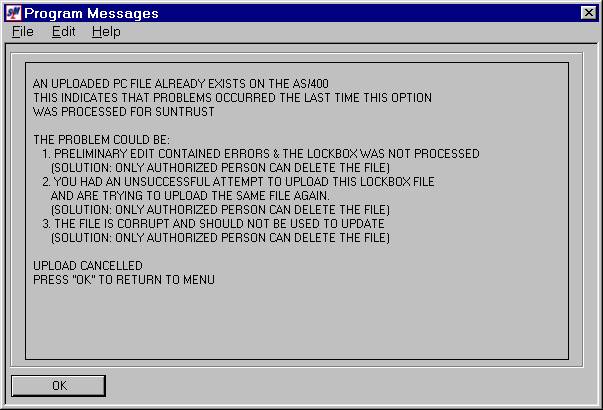
Note: resolve the problem; call SkilMatch for
assistance if necessary.
If an uploaded PC file does NOT already exists on the AS/400, the screen
will display:
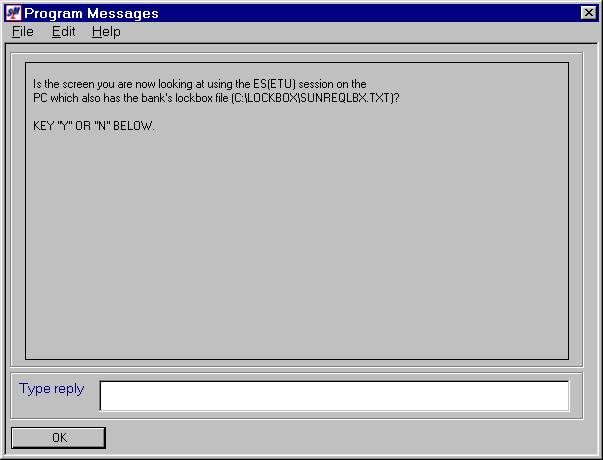
If you are signed on and using the ES session on the PC (you would see
a ‘green screen’, not a screen like the one above) which also has the bank’s
lockbox file (C:\lockbox\filename.txt), key Y and click [OK].
If you are NOT signed on and using the ES session on the PC which also
has the bank’s lockbox file (C:\lockbox\filename.txt), key N and click [OK].
If you key Y in error, the screen
will display:
Note: resolve the problem; call SkilMatch for
assistance if necessary.
If you key Y and you really are signed on and using the ES session on the PC which also has the bank’s lockbox file (C:\lockbox\filename.txt), you will see various screens flash, and then the screen will display:
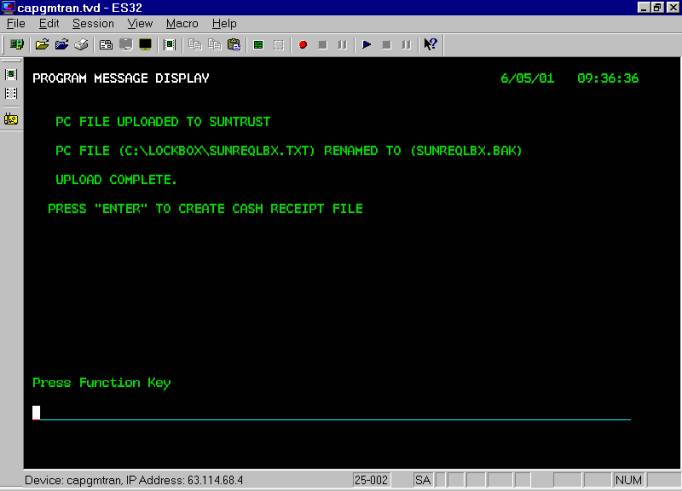
For further information, refer to Create Cash Receipt File.
If you key N, the screen will display:

If you are NOT signed on and using the ES session on the PC, you do
NOT have the ES session open (sign-on screen), and/or do NOT know the ES
session ID, and/or do NOT wish to continue, key Y to cancel and click [OK]. You will be returned to the “Accounts
Receivable Lockbox Processing” menu.
If you are NOT signed on and using the ES session on the PC but you do
have the ES session open (sign-on screen) and know the ES session ID and wish
to continue, key N to cancel and click [OK].
The screen will display:
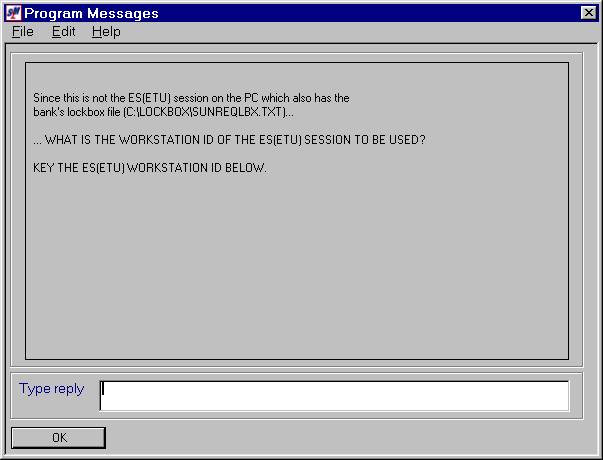
What Is The Workstation
ID Of The ES Session To Be Used:
Key the workstation ID of the ES session you have open and click [OK].
Note: not case-sensitive.
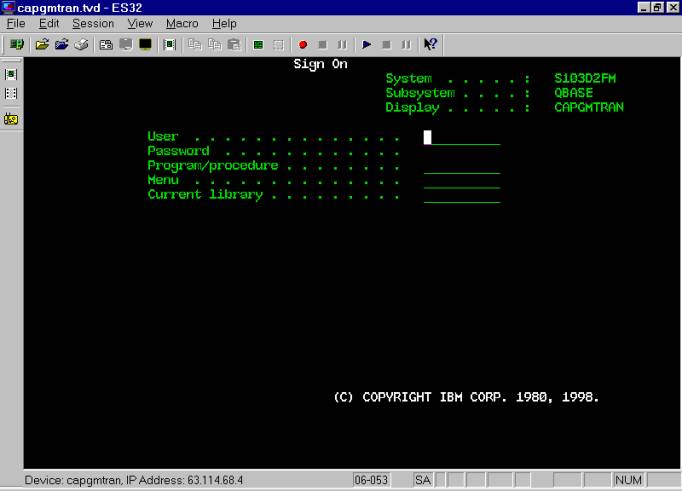
Note: to find out what the ES session ID is, go to that sign-on screen and look in the upper right corner for DISPLAY. On the example below, the session ID is CAPGMTRAN.
The screen will display:
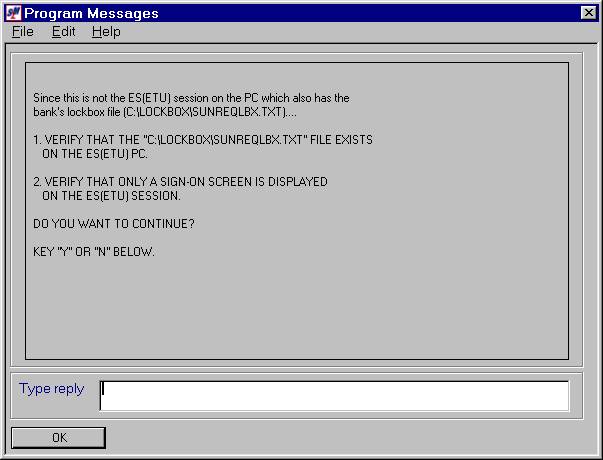
If the PC does NOT have the bank’s lockbox file
(C:\lockbox\filename.txt) or if the ES session is NOT open (only a sign-on
screen is displayed), key N to continue.
You will be returned to the “Accounts Receivable Lockbox Processing”
menu.
If the PC has the bank’s lockbox file (C:\lockbox\filename.txt) and the ES session is open (only a sign-on screen is displayed), key Y to continue.
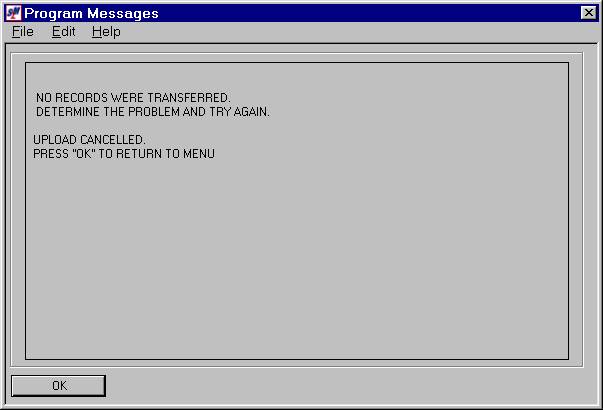
If you chose to continue, but no checks were in the lockbox file from the bank, the screen will display:
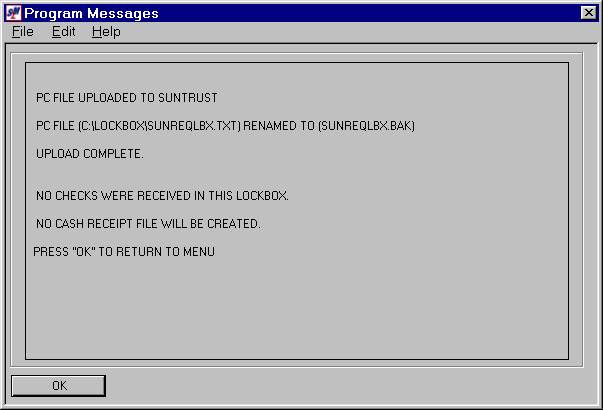
Note: using
the backup documentation the bank provides to you (copies of the checks in the
lockbox file or the stubs of checks in the lockbox file) verify that the
lockbox file truly contained no checks.
If necessary, interface with your bank.
If the lockbox file should contain checks, the file should be checked by
the bank and re-retrieved by you from the bank. Once the file has been re-retrieved, try the [Convert Lockbox] option again.
OR
If you chose to continue, but a problem is encountered, the screen will display:

Note:
verify that the bank’s lockbox file exists on the PC
(C:\lockbox\filename.txt) and that the ES session is open (only a sign-on
screen is displayed). If the file does
NOT exist on the PC or the ES session was NOT open (only a sign-on screen is
displayed), correct the problem and try the [Convert Lockbox]
option again.
OR
If you chose to continue, but errors are found during the preliminary edit, the screen will display:
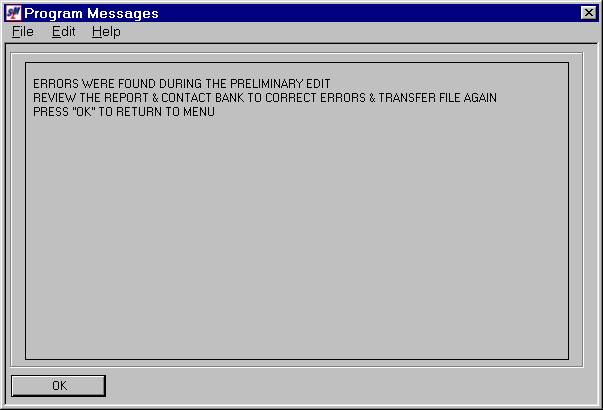
Note: review the preliminary edit report to identify the errors. (Refer to Reports for further information concerning this edit). Contact the bank to have them correct errors and then retrieve the file from the bank again.
OR
If you chose to continue, and no problems are encountered, your screen
will remain ‘input inhibited’ while the file is uploaded from the PC to the
AS/400.
The screen will display:
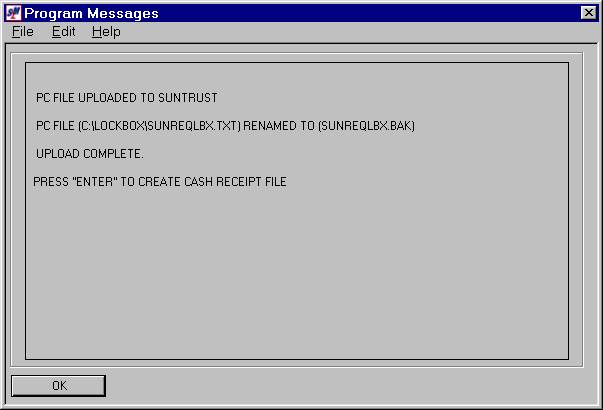
Click [OK] to
create the cash receipt file. Your screen will remain ‘input inhibited’
while the cash receipt file is created.
You will be returned to the “Accounts Receivable Lockbox Processing”
menu.
This step creates the LBXCSH file members.
Each time a lockbox file is received, the program analyzes the file and creates one or more lockbox batches. A new batch is created each time there is a change in the bank batch number within a given file and that batch has a different deposit month than the previous batch. Normally, only one cash receipts batch will be created, but at the end of the month (especially if it falls during a weekend), it is quite possible two batches will be created.
The lockbox program generates the batch number for these batches (B + the four digit deposit year + the deposit month + a sequence number. Example a May 2001 batch would be B20010501). The sequence numbers for these batches may not always fall in the order the batches are processed. The program starts with sequence number 01 and checks to see if a batch exists with that sequence number. If one is not found, that is the number assigned. If one is found, the sequence number is incremented by one and it continues the process until an available sequence number is found. If no available sequence number is found, processing is aborted and all cash receipt batches created for the lockbox being processed are deleted. The user is notified with an on-screen message 'THERE ARE CURRENTLY 99 OPEN BATCHES FOR XX/XXXX, YOU MUST EITHER POST OR DELETE AT LEAST ONE OF THESE BATCHES BEFORE THE CASH RECEIPTS FILE FOR THIS LOCKBOX CAN BE CREATED. PRESS ENTER TO RETURN TO MENU'.
If this occurs, the user should reduce the number of open batches by
either posting or deleting them (delete should only be used if the batch was
uploaded multiple times or was manually entered and posted). To resume processing for this lockbox, the
user will select the option again, respond to the on-screen message that an
error occurred during the last processing with a YES and the program will
restart at this step.
During the lockbox processing, the program attempts to check the
validity of the data received. The
invoice number is checked to make certain it is valid, the balance due on the
invoice is checked against the amount to be applied, the ABA file is checked to
see if the customer for the invoice matches information in that file, the
transaction is checked to see if "F"ull payment should be applied
(payment amount is within the variable range entered in the A/R system file),
and that the total of the transactions balance to the total of the check.
In addition to checking the transaction information and creating the
cash receipts file, records may be added to the customer ABA file. Records will
be added to the customer ABA file (so long as no record currently exists) when
a lockbox entry is processed that has both the invoice number and the amount due matching the
information received in the lockbox. In addition, if the bank provides
the customer account code and that code is valid, if there is an existing
customer ABA record that contains the same first 6 characters of the customer code
(exp. SHAGEN, SHAGEN01), the additional customer code will have a record added
to the file.
If the invoice number provided by the bank is invalid, or no invoice
number is provided, every effort will be made to try and identify the invoice
the transaction should be applied to. If the customer group can be identified
(either from another transaction for this check that has a valid invoice number
or thru checking the customer ABA file), all open invoices for the customer
group (or groups if more than one customer group code is found attached to this
ABA account in the customer ABA file) are searched in an effort to find an
invoice with a matching balance due. If
only one invoice is found with this amount as the balance due (the search also
will check for the amount matching balance due plus late fee if receipt is past
the late charge due date), the transaction is applied to that invoice. If multiple transactions are found with a
balance due matching the amount to be applied, the invoice number listed in the
transmittal file is placed in the cash receipt record for the user to
identify. If there was no invoice
number listed on the transmittal from the bank and the user has a "Y"
entered in response to the "MATCH AMTS FOR CUSTOMER, NO INVOICE#"
question on the A/R control file maintenance screen, the system will search the
open invoices for the customer group (or groups) to see if multiple invoices
will add to the total listed as the amount to be applied. If so, a cash receipt record will be created
for each invoice in the records identified as matching the total to be
applied.
If no invoice number was attached to the transaction and the invoice
number (or numbers) cannot be identified, if the customer was identified, the
transaction is listed as a PREPAY to the customer's account.
If a check is received with multiple invoices listed, but with only
one invoice showing an amount to apply, the program will spread the amount to
be applied to all of the invoices listed (or as far as it can). The invoices are checked in the order
entered and the amount to be applied is listed as the balance due on the
invoice. When the amount to be applied
has been spread as far as possible, the system leaves the rest with nothing to
be applied. If more is received than needs
to be applied, the excess is added to the first invoice listed.
The program generates a report on the transactions
received in the lockbox. The member
name of the LBXCSH file is listed at the top of this report. The user should be sure to note this member
name so that he may select the correct batch when editing, correcting or
posting the batch. The last two
positions of the member name indicates the batch number.
If the program has made any assumptions, the assumption codes are
listed on the report to the right of the transaction. A table defining the assumption codes is listed at the bottom of
the report. Refer to Reports
for further information concerning this edit.
Preliminary Edit of xxx Lockbox - after the file has been uploaded (from the PC to the AS/400), a preliminary edit is produced to make certain the data received from the bank is error-free. If no errors are found, the report states this, otherwise the type of errors found are listed on the report.
Note: if
you receive any of the following messages on this edit, you must interface with
your bank to receive a new file. This
file CANNOT be processed. Refer to
document Menu
ARLKBX, Item View Lockbox to view the file for error analysis. It may also be necessary to interface with
SkilMatch to resolve the problem (bank may have changed their format, etc.).
The possible error messages generated are:
(1) Error was found in a date field (all dates must be valid dates).
(2) Error found in sequence of records (records were
not found in the expected sequence).
(3) Error found in a total field (either total of
checks does not match batch total record or transmittal total does not match
total of all batches).
(4) Number or records in transmittal does not match
transmittal total (number of records specified by bank in this transmittal does
not match number of records received.)
Lockbox Checks (LB010) – after the lockbox batch(es) are created, a
report is produced listing the transactions received in the lockbox.
Note: check every entry on this report that has an assumption code. You should attempt to verify or correct each situation before posting.
Note: the member name of the LBXCSH file is listed at the top of this report. The user should be sure to note this member name so that he may select the correct batch when editing, correcting or posting the batch. The last two positions of the member name indicates the batch number.
If the program has made any assumptions, the assumption codes are
listed to the right of the transaction.
A table defining the assumption codes is listed at the bottom of the
report. The assumption codes are as
follows:
(A) Invoice amount does not match amount applied
(amount to be applied listed on transmittal does not match amount being
applied).
(B) Balance due for this invoice does not match amount
being applied (balance due varies from amount being applied)
(C) Possible problem with the invoice number in the
lockbox file. Must be checked.
The invoice number in the lockbox file exactly matches an invoice
number in the SkilMatch open invoice file.
(The customer code tied to this invoice in SkilMatch is ‘assigned’ to
this invoice in the lockbox file).
BUT
The cash receipt dollars for that invoice (in the lockbox file) do NOT
exactly match the balance due for that invoice number (in the SkilMatch open
invoice file). Could be a partial
payment or an overpayment; could also be the invoice number was keyed
incorrectly by the bank in the lockbox file.
AND
When the bank account number/bank routing number/’assigned’ customer
code (in the lockbox file) is compared to bank account numbers/bank routing
numbers/customer codes (in the customer ABA file) a different customer is
reflected. The customer codes in these
two files do not even belong to the same customer group. Could be the invoice number was keyed
incorrectly by the bank in the lockbox file.
OR
The bank account number/bank routing number (in the lockbox file)
cannot be found in the customer ABA file.
Other cash receipts on the same check number (in the lockbox file)
reflect a different customer than the ‘assigned’ customer. The customer codes do not even belong to the
same customer group. Could be the
invoice number was keyed incorrectly by the bank in the lockbox file.
(E) Invoice amount greater than amount allowed by
system. Balance applied to PREPAY
account (if the transaction listed an apply amount greater than 9,999,999.99).
(F) Payment within variable, Full Pay is applied
(transaction was within variable entered in the A/R system control file, marked
with an "F" in the apply field in the cash receipt record).
(I) Invoice number transaction is being applied to
does not match invoice number supplied by bank.
(N) Neither customer code nor invoice can be
determined (system could not identify where transaction should be applied).
(P) Check is out of balance, difference applied to
Prepay account.
(S) Invoice amount specified by bank has been split
between multiple invoices (A/R control file had a "Y" in the
"MATCH AMTS FOR CUSTOMER, NO INVOICE#" field and the transaction had
no invoice number listed).
(V) Invoice number supplied is not valid; invoice to
be paid cannot be determined.
Cash Receipts Edit Listing (AR220) – for each cash receipts batch that is created, a cash receipts edit report is produced. This report lists every transaction received from the bank even if there is a problem with the transaction that will prevent it from posting.
Note:
SkilMatch recommends you do NOT delete any records from a lockbox cash
receipts batch. If the problem cannot
be resolved, leave the record in the cash receipts batch and post. Your cash receipts register will list the
items that did NOT post in addition to the items that did post. This information may prove helpful for
future reference.
Note: if you try to post cash receipts that have
errors, they will NOT be posted, and will be deleted from the file.
Note: any record on the cash receipts edit listing
(produced when cash receipts were entered) marked: "WILL NOT BE POSTED” will appear on the Cash Receipt
Register marked “RECORD NOT ADDED".
To edit cash receipts, refer to Menu ARLKBX, Item Edit Lockbox.
Once all editing is complete and you have verified/corrected assumptions, you will proceed to posting. Refer to Menu ARLKBX, Item Post Lockbox.
Note: it is
recommended that you post lockbox cash receipts as they are received. Lockbox cash receipts should be posted in
order by date. If you post an “old”
lockbox cash receipt batch, be sure to re-edit all “newer” lockbox cash receipt
batches before posting. The status of
cash receipts in the newer batches may have changed by the posting of the older
batch.