INTRODUCTION
TO SETTING UP THE GENERAL LEDGER
The following steps should be taken
to set up the general ledger in
SkilMatch.
1. Design (but do not enter) general ledger account numbers (refer to document Menu GLMANT, Item Accounts.
2. Design (but do not enter) your financial statement tailoring (refer to document Menu GLMANT, Item Tailoring).
3. Enter company names (refer to document Menu GLMANT, Item Company).
4.
Create and enter names for the cost centers (refer to Menu
GLMANT, Item Cost Center Descriptions).
5. Enter general ledger account numbers for the balance sheet accounts and one cost center (refer to document Menu GLMANT, Item Accounts).
6. Use the system to
create the additional cost center account numbers (Menu
GLMANT, Item Copy Chart of Accounts).
7. Add and delete account numbers to the completed Chart of Accounts (Menu GLMANT, Item Accounts).
8. Enter financial statement tailoring (refer to document Menu GLMANT, Item Tailoring).
9. Set retained earnings numbers for current and prior year earnings (refer to Menu GLMANT, Item Retained Earnings).
10. Set group number for percentage calculations (refer to Menu GLMANT, Item Set Group).
11. (Optional) Establish consolidations (company and/or cost center) (refer to Menu GLMANT, Item Consolidations or Menu GLMANT, Item Division Consolidation).
12. Enter budget and/or prior
year data (refer to Menu
GLMANT, Item Budgets and Prior and Menu
GLMANT, Item Duplicate Budget).
13. Activate budget and/or prior year data (refer to Menu GLMANT, Item Activations).
14. (Optional) Enter beginning
balances (refer to documentation concerning ‘Beginning Balances in General
Ledger’ in document Menu
GLJOUR, Item Data Entry).
15. (Optional) Maintain
valid posting periods for all SkilMatch accounting applications (refer to Menu
GLMANT, Item GL Posting Periods).
GL Posting Periods
A simple, yet costly, problem that can face your company is the posting of accounting data to the WRONG fiscal period or year. To restrict the opportunity for these mistakes, you can establish valid posting period/year combinations for each of the SkilMatch applications that post directly into the General Ledger.
To begin, on the “General Ledger Master” menu, click [Maintenance].
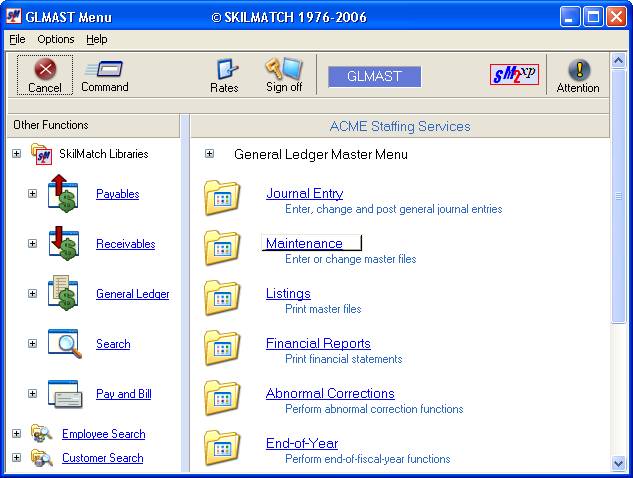
The screen will display:
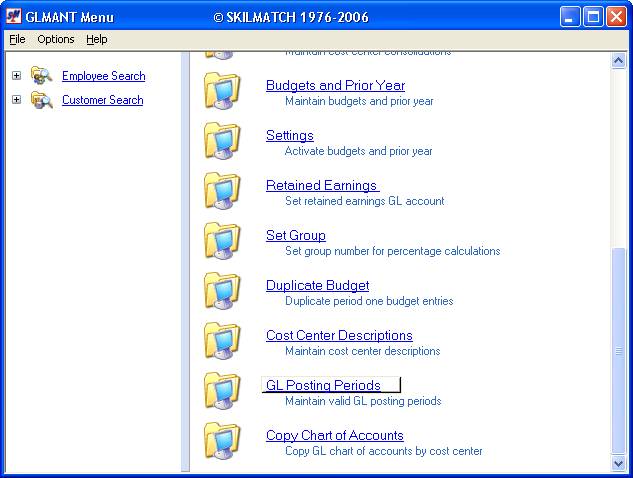
Click [GL Posting Periods].
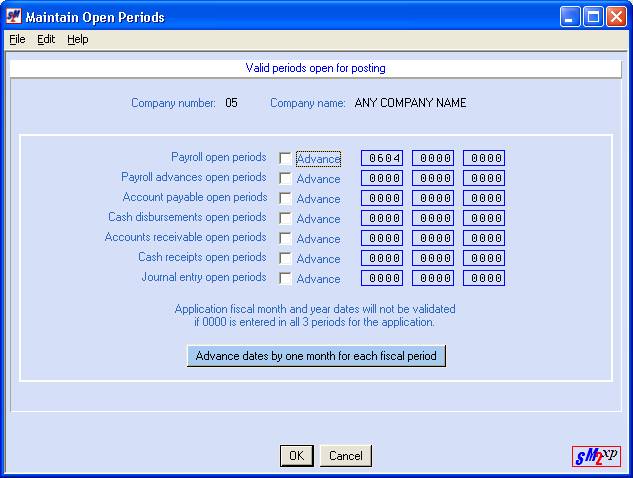
The screen will display:
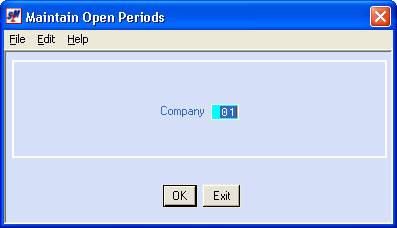
Company
Key the Company number whose posting periods you wish to restrict or validate.
Click [OK] to continue, or click [Exit] and you will be returned to the “General Ledger Master” menu.
If you chose to continue, the screen will display:
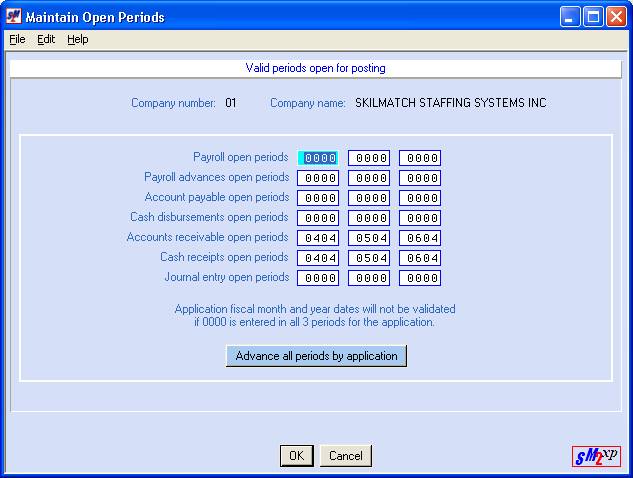
You do not have to key dates in all 3 posting areas, or even in all of the accounting applications. There may be some applications where you will key only 1 valid period/year combination (like Cash Receipts), others that have all 3 areas assigned (like A/P invoices), and still others where you may not want any restrictions (like GL journal entries).
Payroll open periods
Key up to 3 valid period/year (MMYY) combinations that can be used during the posting of payroll (Payroll Update options).
Payroll advances open periods
Key up to 3 valid period/year (MMYY) combinations that can be used during the posting of payroll advance checks.
Accounts Payable open periods
Key up to 3 valid period/year (MMYY) combinations that can be used during the posting of Accounts payable invoices.
Cash Disbursements open periods
Key up to 3 valid period/year (MMYY) combinations that can be used during the posting of manual cash disbursements and computer-generated check writing.
Accounts Receivable open periods
Key up to 3 valid period/year (MMYY) combinations that can be used during the posting of Accounts receivable invoices – those posted during the payroll, and those posted manually in the A/R library.
Cash Receipts open periods
Key up to 3 valid period/year (MMYY) combinations that can be used during the posting of cash receipts.
Journal entry open periods
Key up to 3 valid period/year (MMYY) combinations that can be used during the posting of GL journal entries.
Advance
all periods by application
Rather than having to manually change the valid periods at the end of a fiscal period, the system will automatically advance them for you.
Click the button that reads [Advance all periods by application].
The system will display:
Click the box beside each application that you want to move forward by one period.
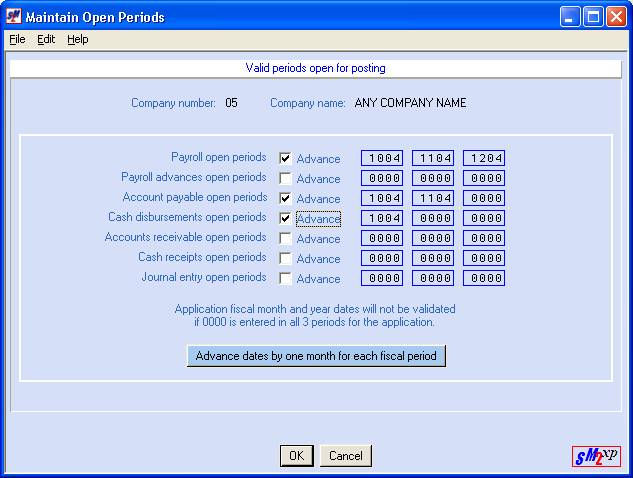
Click [Advance all periods by application] to change the dates or click [Cancel] to cancel the advancing of dates.
If you clicked [Advance all periods by application], the screen will display:
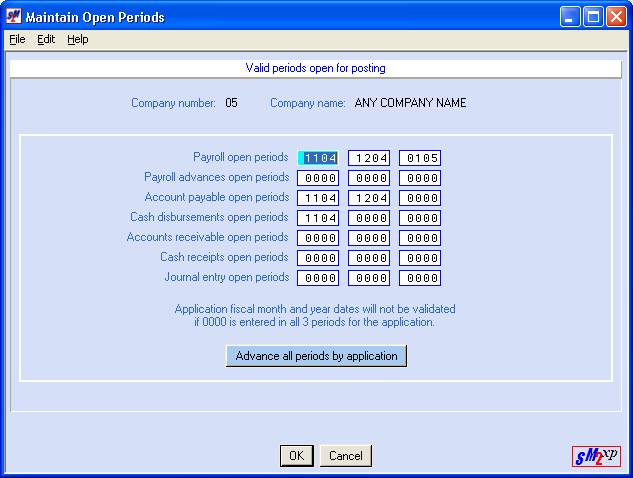
If the dates meet your approval, click [OK]. If the changes are not correct, click [Cancel].