INTRODUCTION
TO SETTING UP THE GENERAL LEDGER
The following steps should be
taken to set up the general ledger in SkilMatch.
1. Design (but do not
enter) general ledger account numbers (refer to document Menu
GLMANT, Item Accounts.
2. Design (but do not enter)
your financial statement tailoring (refer to document Menu
GLMANT, Item Tailoring).
3. Enter company names (refer to
document Menu
GLMANT, Item Company).
4.
Create and enter names for the cost centers (refer to Menu
GLMANT, item Cost Center Descriptions).
5. Enter general ledger
account numbers for the balance sheet accounts and one cost center (refer to
document Menu
GLMANT, Item Accounts).
6. Use the system to create the
additional cost center account numbers (refer to document Menu
GLMANT, item Copy Chart of Accounts).
7. Add and delete account
numbers to the completed Chart of Accounts (refer to document Menu
GLMANT, item Accounts).
8. Enter financial statement
tailoring (refer to document Menu
GLMANT, Item Tailoring).
9. Set retained earnings numbers
for current and prior year earnings (refer to Menu
GLMANT, Item Retained Earnings).
10. Set group number for
percentage calculations (refer to Menu
GLMANT, Item Set Group).
11. (Optional) Establish
consolidations (company and/or cost center) (refer to Menu
GLMANT, Item Consolidations or Menu
GLMANT, Item Division Consolidation).
12. Enter budget and/or prior
year data (refer to Menu
GLMANT, Item Budgets and Prior and Menu
GLMANT, Item Duplicate Budget).
13. Activate budget and/or prior
year data (refer to Menu
GLMANT, Item Activations).
14. (Optional) Enter beginning
balances (refer to documentation concerning ‘Beginning Balances in General
Ledger’ in document Menu
GLJOUR, Item Data Entry).
15. (Optional) Maintain valid
posting periods for all SkilMatch accounting applications (refer to Menu
GLMANT, Item GL Posting Periods).
HOW TO MAINTAIN GENERAL LEDGER ACCOUNTS
Use this option to enter new
account numbers, change the descriptions and group numbers on existing
accounts, and to delete accounts that have had no transaction records for the
current or prior years.
Note: do not delete account numbers that have transactions for
the fiscal year. If you inadvertently delete an account that has had activity,
then you will not be able to print a financial statement. You would receive an
error report that lists the account number(s) that were deleted. Simply re-add the account(s) using this menu
option to correct the problem.
To
begin, on the “General Ledger Master” menu, click [Maintenance].
The
screen will display:
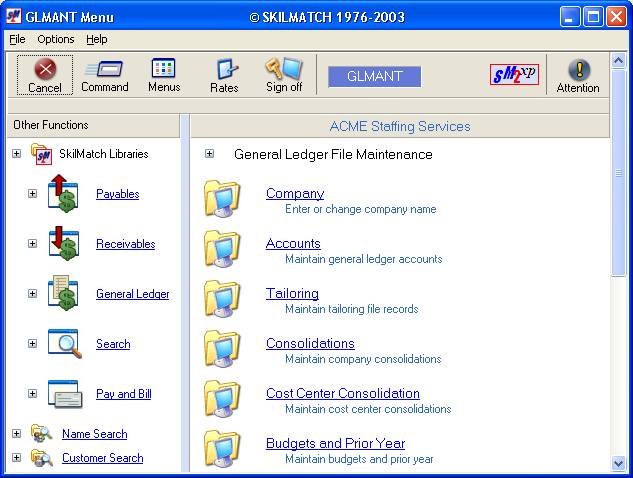
Click [Accounts].
Screen will display:
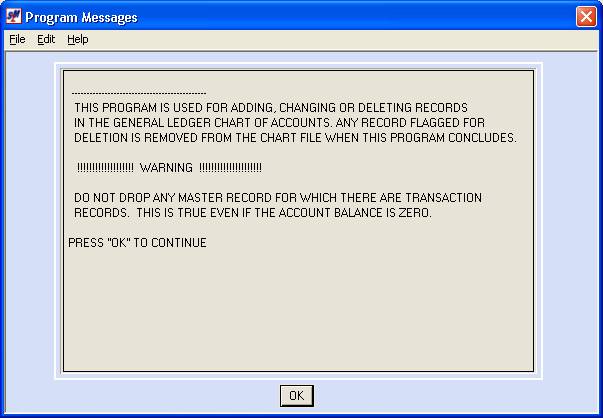
Read this message then
click [OK] to continue.
The screen will display:
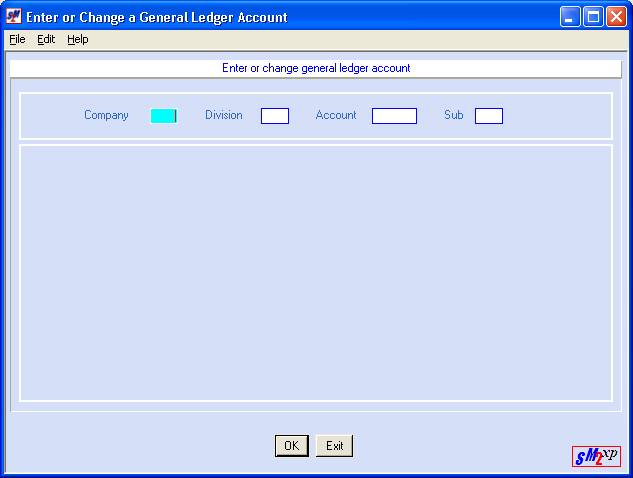
If you plan to process financial statements that consolidate 2 or more G/L companies, then the Disions/Account/Sub account numbers in each company must be IDENTICAL for like accounts.
Company:
Key a valid company number. (To be “valid” you must have previously
created the G/L company number and name.)
Division:
Key 00 if this is a balance
sheet account.
Key
01-89 for income and expense accounts.
Typically, division 89 is
reserved for general and administrative income and costs.
Note: do NOT
use numbers 90 and above for divisions.
Note: this division number is
the numeric representation of a cost center.
Account:
Key a 4-digit account number.
Balance sheet accounts
must range between 0001 to 3999
Income & expense
accounts must range between 4100 to 9999.
Do
not assign account numbers 4000 through 4099 – if you do, your financial statements will not
paginate properly nor have the correct titles.
Typical
account numbering:
1000s Asset accounts
2000s Liability accounts
3000s Equity and Retained Earnings accounts
4000s Income/Sales accounts
5000s Direct Cost of Sales accounts (wages,
payroll taxes, workers comp)
6000s Staff payroll accounts
7000s Expense accounts
8000s “Other” income accounts
Sub:
Key a sub-account number, if
applicable. You may select from 00 to 99.
There are several potential uses
for the sub account area.
First of all – 00 is the number
to use if you have no use for sub accounts.
Potential Uses:
SALES: Sub-account numbers can let you recognize
accounts that are similar, yet preserve the individuality of each balance for
accounting purposes. For example
different kinds of sales.
Example, if 4100 is the account
for temporary sales, you might use sub-account to represent the type of
temp sales (like 01 for clerical, 02 for industrial, 03 for technical). Most
customers, however, use unique account numbers for each sales account, rather
than sub accounts. (4100 for Clerical sales, 4105 for Industrial sales, etc).
WAGE EXPENSE: While many customers break their sales
into different types (temporary and payrolling, or office support and
industrial), most customers do not break out the wage expense into these
same types. However, if you want the
wage accounts to have a similar breakout by type of sale, then you will set up
multiple wage accounts, each with its’ own sub account number. Use the same sub-account numbers on like
accounts. Example, if sub-account 01 is to represent Temporary sales, then you
might have a sales account of 4100-01, and a wage account of 5100-01, etc.
(Posting to different wage expense accounts is activated by the PR Labor
Distributions)
PAYROLL TAX EXPENSE: Also, while many customers break their sales
into different types (temporary, payrolling, inhouse, and more), and a few also
break out the wage expense, most customers do not break out payroll tax
expenses into the same types (temporary, payrolling, inhouse) – all payroll tax
expenses get posted to individual accounts (FICA, medicare, FUTA, SUTA, and
workers’ comp). If you want these
payroll tax accounts to have a further breakout by type of sale, then you will
set up multiple accounts for each kind of payroll tax, each with its’ own sub
account number. Use the same
sub-account numbers on like accounts. Example, if sub-account 01 is to
represent Temporary sales, then you would have a sales account of 4100-01, and
a FUTA account of 5130-01, etc.
(Posting to payroll tax sub-account is activated in the PR GL
Distribution file).
REIMBURSED TEMP EXPENSE: The system will use a single account number
(of your choice) for the posting of expenses reimbursed to temporaries through
payroll. This means that all types of
reimbursed expense would end up in the same pool. If you prefer to break out reimbursed expenses into different
kinds of expenses, then you would create multiple accounts using the same
4-digit account number, but have unique sub-account numbers. (Posting to
reimbursed temp expense sub-account is activated in the PR System Requirements
file.)
BILLED EXPENSE ACCOUNT: The system will use a single account number
(of your choice) for the posting of expenses billed to customers through
payroll. This means that all types of
reimbursed expense would end up in the same pool. If you prefer to break out billed expenses into different kinds
of expenses, then you would create multiple accounts using the same 4-digit
account number, but have unique sub-account numbers. (Posting to billed
customer expense sub-account is activated in the PR System Requirements file.)
BONUSES: The system will use a single account number
for the posting of Holiday pay and Lunch bonus pay. If you prefer to break out these bonuses between accounts, then
you would create multiple accounts using the same 4-digit account number, but
have unique sub-account numbers. (Posting to multiple Holiday and Lunch bonus
expense sub-accounts is controlled by the Bonus Requirement Master file.)
NOTE-- If you plan
to use sub accounts for more than 1 of the uses described above, then the sub
account meaning must be identical for each use. (01=clerical, 02=industrial, or
01=temp, 02=payrolling, etc).
INTERFACE TO NGS: If you have more than 89 cost centers, and
interface to NGS for general ledger, then you cannot use any
of the first 6 uses - your sub-accounts are reserved for expansion to over 89
cost centers.
To proceed, click [OK].
The screen will display:
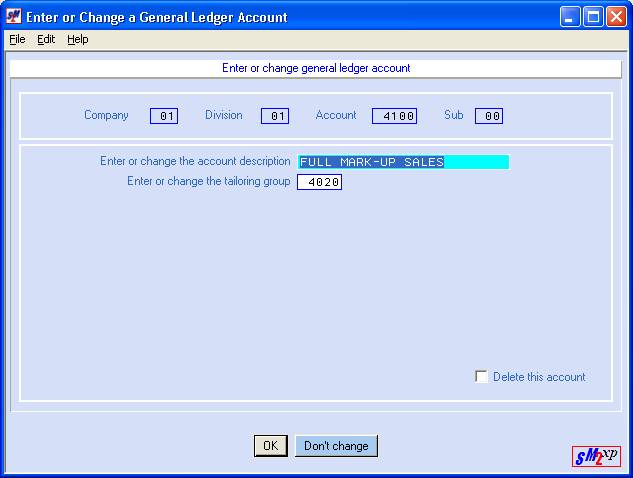
Note: if
this is an existing account, the screen will display the description and the
group number.
Enter Or Change The Account
Description:
Key up to 25-characters of an
appropriate description for this account or make any changes to the existing
description.
Press
the <TAB> key for additional keying.
Enter Or Change The Tailoring
Group:
Every account number is assigned
to a tailoring group for financial statement printing purposes.
Key the group number to which
this account should belong.
Review existing group
numbers from your tailoring file through Menu GLLIST, option Tailoring.
Press
the <TAB> key for additional keying.
Delete:
If this is an active account,
leave this option unselected (no checkmark will appear next to the selection).
If you wish to delete this
account, click once on this option to select (a checkmark will appear next to
the selection).
Note: do NOT delete an account that has
transaction records even if the account balance is zero. If there has been any activity with this
account, do NOT delete it.
To proceed, click [OK].
Note: if you
do NOT wish to add this account or to make changes to it, press [Don’t
change] to bypass this screen without
updating. You will be returned to the
previous screen where you may continue with a different account number.
When you click [OK], this account will be added to your
chart of accounts and the screen will return you to company on the first screen
of the account number entry.
The screen will display the last
account number entered. If you have
additional account numbers to add or update, <TAB>
or key over the displayed number with the next number and follow the preceding
steps.
When you have finished updating
the accounts, click [Exit] to end the job.
You will return to the “General
Ledger Maintenance” menu.